

1. Overview
MVAPICH2-Virt, derived from MVAPICH, is an MPI software to exploit the novel features and mechanisms of high-performance networking technologies with SR-IOV as well as other virtualization technologies such as Inter-VM Shared Memory (IVSHMEM) for Virtual Machine and IPC enabled Shared Memory (IPC-SHM) and Cross Memory Attach (CMA) for Docker/Singularity container. MVAPICH2-Virt can deliver the best performance and scalability to MPI applications running inside both VM and container over SR-IOV enabled InfiniBand clusters.
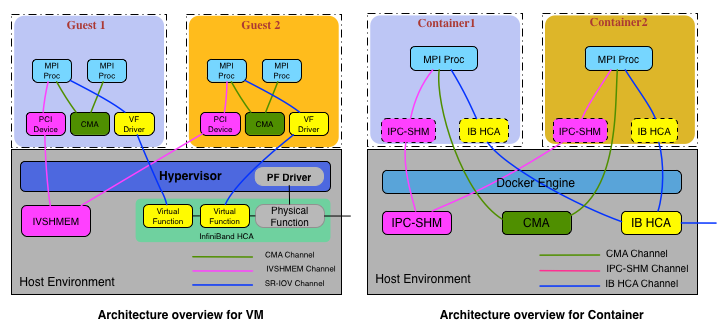
In this package, 1. For VMs, Intra-Node-Intra-VM MPI communication can use Cross Memory Attach CMA) channel, Intra-Node-Inter-VM MPI communication can go through IVSHMEM-based channel, while Inter-Node-Inter-VM MPI communication can leverage SR-IOV-based channel. 2. For Docker containers, all Intra-Node MPI communication can go through either IPC-SHM enabled channel or CMA channel, no matter they are in the same container or different ones. Inter-Node-Inter-Container MPI communication will leverage the InfiniBand channel. 3. MVAPICH2-Virt also properly integrates with Singularity to work on HPC environment.
For processes which are distributed in different VMs/containers, MVAPICH2-Virt can transparently detect the process locality to dynamically select the optimized channel for high-performance data communication.
2. System Requirements
If you are trying to run MVAPICH2-Virt 2.2 package for VMs, then the following software packages need to be installed on your system:
If you are trying to run MVAPICH2-Virt 2.2 package for Docker containers, then the following software package needs to be installed on your system:
If you are trying to run MVAPICH2-Virt 2.2 package for Singularity, then the following software package needs to be installed on your system:
-
https://http://singularity.lbl.gov/ [pull the development branch]
Details about how to configure IVSHMEM and IPC-SHM can be found in Basic Configuration for Administrators
3. Installing MVAPICH2-Virt Package
Running the following rpm command will install the software in /opt/mvapich2/virt/2.2/ directory.
$ rpm -Uvh mvapich2-virt-2.2-1.el7.centos.x86_64.rpm --force --nodeps
The RPMs contained in our packages are relocatable and can be installed using a prefix other than the default of /opt/mvapich2/virt/ used by the package in the previous example.
$ rpm --prefix /custom/install/prefix -Uvh --nodeps <package>.rpm
If you do not have root permission you can use rpm2cpio to extract the package.
$ rpm2cpio <package>.rpm | cpio -id
When using the rpm2cpio method, you will need to update the mpi compiler scripts, such as mpicc, in order to point to the correct path of where you place the package.
|
Tip
|
If you are using a Debian based system such as Ubuntu you can convert the rpm to a deb using a tool such as alien or follow the rpm2cpio instructions above. |
4. Basic Configuration for Administrators
For VMs: To configure SR-IOV environment, please refer to here. To configure IVSHMEM for virtual machines, administrators can add a device model option to QEMU command line as follows.
-device ivshmem,shm=ivshmem-id,size=256m
After the virtual machines start up, administrators should be able to see a shared memory region called “ivshmem-id” under the directory of /dev/shm in the physical node where the virtual machine resides. In order to support Intra-Node-Inter-VM shared memory based communication, the above commands for launching co-resident virtual machines must have the same “ivshmem-id” and “size”, and the size must be power of two.
For Docker containers: To launch Docker container with IPC-SHM and InfiniBand access, administrators can use the following command.
docker run --pid=host --ipc=host --privileged -v /dev/shm:/dev/shm -v /dev/infiniband:/dev/infiniband -t -i -d IMAGE [COMMAND]
In addition, to communicate across different Docker containers, each Docker container needs to be configured with an IP address. There are several ways to implement this, it depends on the specific environment in practice.
5. Basic Configuration for Users
For VMs: After administrators set up IVSHMEM for the allocated virtual machines, users can check the existence of IVSHMEM device inside each virtual machine through the lspci command. It indicates that you have set up a valid IVSHMEM device, when you see the following output.
00:05.0 RAM memory: Red Hat, Inc Device 1110
Note that the PCI number depends on the specific configuration of virtual machine. So users may have different numbers other than “00:05.0”. Before running jobs with MVAPICH2-Virt, users must check whether they have the permission to read from and write to the IVSHMEM device. If not, the chmod command can be used to change the access permission. In our example, it is
$ chmod 744 /sys/bus/pci/devices/0000:00:05.0/resource2
6. Basic Usage Instructions
6.1. Compile Applications
MVAPICH2-Virt provides a variety of MPI compilers to support applications written in different programming languages. Please use mpicc, mpif77, mpiCC, or mpif90 to compile applications. The correct compiler should be selected depending upon the programming language of your MPI application. These compilers are available in the MVAPICH2-Virt $HOME/bin directory. The MVAPICH2-Virt installation directory can also be specified by modifying the $PREFIX, then all the above compilers will also be present in the $PREFIX/bin directory.
For Singularity, please refer to The MVAPICH2 Userguide for the details about compiling applications with Singularity.
6.2. Run Applications
This section provides instructions on how to run applications with MVAPICH2-Virt. And this section shows the examples of running applications with mpirun_rsh. Please see the default MVAPICH2 userguide for more information on running with other process managers.
-
Either ssh or rsh should be enabled between the front nodes/VMs/containers and the computing VMs/containers. In addition to this setup, you should be able to login to the remote VMs/container without any password prompts.
-
All host names should resolve to the same IP address on all machines. For instance, if a machine’s host names resolves to 127.0.0.1 due to the default /etc/hosts on some Linux distributions it leads to incorrect behavior of the library.
-
For Docker/Singularity containers, MV2_CONT_USE_IPC=1 is set by default. Thus, IPC-SHM enabled communication will be leveraged by default.
-
For VMs, it’s required to explicitely set MV2_VIRT_USE_IVSHMEM=1 on the command line in order to use shared memory backend channel for Intra-Node-Inter-VM communication.
For Docker containers:
$ mpirun_rsh -np 4 cont0 cont0 cont1 cont1 ./cpi
This command launches cpi on containers cont0 and cont1, two processes per container. By default ssh is used.
$ mpirun_rsh -rsh -np 4 cont0 cont0 cont1 cont1 ./cpi
This command launches cpi on containers cont0 and cont1, two processes per container using rsh instead of ssh. More other options of mpirun_rsh can be obtained using the --help option.
For Singularity:
$ mpirun_rsh -np 2 node1 node2 $ENV /usr/local/bin/singularity exec
/tmp/Singularity.img /usr/bin/cpi
This command launches two Singularity containers on pyhsical node1 and node2 with optional runtime parameters $ENV, and run the executable cpi, which is inside the image Singularity.img.
$ mpirun_rsh --help
For VMs: The corresponding commands are as follows:
$ mpirun_rsh -np 4 vm0 vm0 vm1 vm1 MV2_VIRT_USE_IVSHMEM=1 ./cpi
This command launches cpi on VMs vm0 and vm1, two processes per VM. By default ssh is used.
$ mpirun_rsh -rsh -np 4 vm0 vm0 vm1 vm1 MV2_VIRT_USE_IVSHMEM=1 ./cpi
This command launches cpi on VMs vm0 and vm1, two processes per VM using rsh instead of ssh. More information about how to use mpirun_rsh can be found in the default MVAPICH2 userguide.
7. Advanced Usage Instructions
In this section, we present the usage instructions for advanced features provided by MVAPICH2-Virt. MVAPICH2-Virt provides different parameters for enabling/disabling advanced features and tuning performance for a wide variety of platforms and applications. These parameters are runtime parameters. In this section we classify these parameters depending on what you are enabling or tuning for and provide guidelines on how to use them.
7.1. Enabling/Disabling IVSHMEM/IPC-SHM Optimizations
As we just introduced, MVAPICH2-Virt enables IPC-SHM optimizations by default for containers. To use IVSHMEM based optimizations for VMs, the uses need to explicitely set MV2_VIRT_USE_IVSHMEM=1.
Setting MV2_CONT_USE_IPC=0 MV2_VIRT_USE_IVSHMEM=0 at the same time will disable both IPC-SHM and IVSHMEM based optimizations. By enabling either IPC-SHM or IVSHMEM optimization, users should be able to get better performance. Therefore, we strongly recommend users to enable this feature.
7.2. Support for User-specified IVSHMEM Device for VMs
MVAPICH2-Virt can automatically select an IVSHMEM device if multiple devices are available in the virtual machines. MVAPICH2-Virt also provides the support for users to manually select an IVSHMEM device, by setting the parameter MV2_VIRT_IVSHMEM_DEVICE. For example, a user can use the following way to identify which device to be used in MPI jobs.
$ MV2_VIRT_IVSHMEM_DEVICE=/sys/bus/pci/devices/0000:00:05.0/resource2
7.3. Support for Integration with OpenStack for VMs
For OpenStack based Cloud environments, we provide scripts for integration with OpenStack by adminstrators to set up SR-IOV and IVSHMEM devices in VMs, which are needed by the MVAPICH2-Virt library. These scripts are compute-tools.sh, controller-tools.sh and ivshmem-tools.sh. Look for them under
$PREFIX/share/mvapich2-virt
Before running the above scripts, please run "source openrc.sh" to enable tenant/user credentials so that you have the permissions to execute different OpenStack commands. The detail steps are as follows:
This script should be executed on all compute nodes. It sets "pci_passthrough_whitelist" in OpenStack NOVA configuration with Vendor_ID and Product_ID for Virtual Function of Mellanox SR-IOV capable network device. After setting, it will restart the libvirtd and OpenStack NOVA compute services.
To manually set these two IDs (Vendor_ID and Product_ID) as arguments, adminstrators can execute the following command on compute nodes to get them first. They are most probably in the last square brackets. In our example, Vendor_ID is 15b3, and Product_ID is 1004.
$ lspci -nn | grep Mellanox | grep "Virtual Function"
02:00.1 Network controller [0280]: Mellanox Technologies MT27500/MT27520 Family [ConnectX-3/ConnectX-3 Pro Virtual Function] [15b3:1004]
The two input arguments are optional, which means the script can automatically detect these two IDs when executing on compute nodes. Please note that these two IDs are also needed when setting on controller node. The exampples of running this script is as below:
$./contrib/virt-scripts/compute-tools.sh
or
$./contrib/virt-scripts/compute-tools.sh -vendor_id 15b3 -product_id 1004
This script should be executed on the controller node only. It sets "pci_alias" for Virtual Function of Mellanox SR-IOV capable network device with Vendor_ID and Product_ID, which are the same as we get on compute nodes. Then it restarts related OpenStack services. After that, it defines the flavor for virtual machines, which includes flavor name, id, memory size, disk size, number of vcpus and number of virtual functions. As the following example shown, the first seven arguments are required and the last one is optional. Users can set the number of virtual functions they want to passthrough to each virtual machine by flag "-sriov". Its default value is 1.
$./contrib/virt-scripts/controller-tools.sh -vendor_id 15b3 -product_id 1004 -flavorname mv2-virt -flavor_id 5 -ram 4096 -disk 10 -vcpus 4 [-sriov 1]
The adminstrators can use this script to hotplug/unplug the IVSHMEM device to/from specified virtual machines. As the following example shown, it can accept four arguments in order to hotplug an IVSHMEM device to a virtual machine, which are "attach", virtual machine hostname, unique ivshmem tag, size of ivshmem (unit: MB). Note that the ivshmem tag for different users must be different. Otherwise, co-located virtual machines that different users launched will share the same IVSHMEM region with each other, which may results in unexpected data overwritten. And currently the value of ivshmem size will be capped by 256MB, due to the co-existence issue of SR-IOV and IVSHMEM devices inside one VM as we mentioned above. To unplug the IVSHMEM device, arguments "detach" and virtual machine hostname are needed.
$./contrib/virt-scripts/IVSHMEM-tools.sh  attach  VM1  g290da24  256
$./contrib/virt-scripts/IVSHMEM-tools.sh  detach  VM1
8. OSU Micro Benchmarks
The OSU benchmarks should already be installed along with MVAPICH2-Virt 2.2. Look for them under
$PREFIX/libexec/mvapich2
Sample performance numbers for these benchmarks on representative platforms with InfiniBand adapters are also included in the performance of the mvapich website. You are welcome to compare your performance numbers with our numbers. If you see any big discrepancy, please let us know by sending an email to mvapich-discuss.
8.1. Download and Build Stand-alone OSU Benchmarks Package
The OSU Benchmarks can also be downloaded as a separate package from here. You can build the benchmarks using the following steps if mpicc is in your PATH. For example:
$ ./configure --prefix=<path-to-install> && make && make install
If mpicc is not in your path or you would like to use another particular version you can explicitly tell configure by setting CC. For example:
$ ./configure CC=/path/to/special/mpicc --prefix=<path-to-install> && make && make install
8.2. Examples for Running OSU Micro Benchmarks
The OSU Benchmarks are run in the same manner as other MPI Applications. The following examples will use mpirun_rsh as the process manager. Please see the default MVAPICH2 userguide for more information on running with other process managers.
For Docker containers: The following example will measure the latency and bandwidth of communication between two Docker containers (node1-cont1 and node1-cont2) inside a same host.
$ mpirun_rsh -np 2 node1-cont1 node1-cont2 ./osu_latency
$ mpirun_rsh -np 2 node1-cont1 node1-cont2 ./osu_bw
The following example will measure the latency and bandwidth of communication inside one Docker container (node1-cont1 and node1-cont1).
$ mpirun_rsh -np 2 node1-cont1 node1-cont1 ./osu_latency
$ mpirun_rsh -np 2 node1-cont1 node1-cont1 ./osu_bw
The following example will measure the latency and bandwidth of communication between two Docker containers (node1-cont1 and node2-cont1) on two hosts.
$ mpirun_rsh -np 2 node1-cont1 node2-cont1 ./osu_latency
$ mpirun_rsh -np 2 node1-cont1 node2-cont1 ./osu_bw
For Singularity, The following example will measure the latency and bandwidth of communication between two Singularity containers on two different pyhsical nodes, node1 and node2.
$ mpirun_rsh -np 2 node1 node2 singularity exec /tmp/Singularity.img /usr/bin/osu_latency
$ mpirun_rsh -np 2 node1 node2 singularity exec /tmp/Singularity.img /usr/bin/osu_bw
For VMs: Similarly, the command will be as follows:
$ mpirun_rsh -np 2 node1-vm1 node1-vm2 MV2_VIRT_USE_IVSHMEM=1 ./osu_latency
$ mpirun_rsh -np 2 node1-vm1 node1-vm2 MV2_VIRT_USE_IVSHMEM=1 ./osu_bw
9. FAQ and Troubleshooting with MVAPICH2-Virt
Here we include some of the problems a user may experience and the steps to resolve them. If you are experiencing any other problem, please feel free to contact us by sending an email to mvapich-discuss.
9.1. Issues with IVSHMEM Device Access inside VMs
-
Permission Denied: Users may encounter permission denied issues when MVAPICH2-Virt tries to access IVSHMEM devices on virtual machines. As we mentioned in Basic Configuration for Users, please make sure you have read and write permission to the IVSHMEM device before running the jobs.
-
Segmentation Fault: The different sizes of IVSHMEM regions for co-resident virtual machines may cause segmentation fault error, when running tests. Please refer to Section 3.4 and contact with the administrator to confirm the size.
9.2. Running Multiple Jobs Simultaneously inside VMs
To run multiple jobs simultaneously on the same set of virtual machines, the administrator has to configure multiple IVSHMEM devices for each virtual machine. When the user wants to run multiple MPI jobs simultaneously, the user needs to explicitly specify one IVSHMEM device for each job by setting runtime parameter MV2_VIRT_IVSHMEM_DEVICE as mentioned in Support for User-specified IVSHMEM Device.