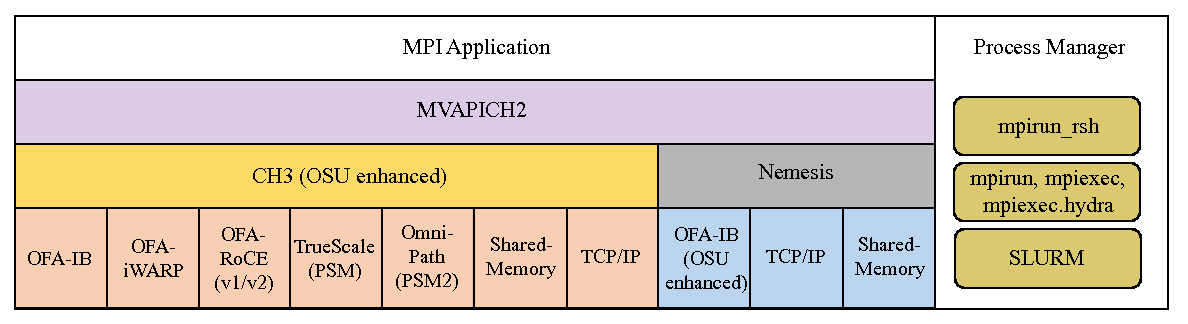
Figure 1: Overview of different available interfaces of the MVAPICH2 library
MVAPICH2 2.3.7 User Guide
MVAPICH Team
Network-Based Computing Laboratory
Department of Computer Science and Engineering
The Ohio State University
http://mvapich.cse.ohio-state.edu
Copyright (c) 2001-2022
Network-Based Computing Laboratory,
headed by Dr. D. K. Panda.
All rights reserved.
Last revised: March 2, 2022
InfiniBand, Omni-Path, Ethernet/iWARP RDMA over Converged Ethernet (RoCE), Slingshot 10, and Rockport Networks are high-performance networking technologies to deliver low latency and high bandwidth. They are also achieving widespread acceptance due to their open standards.
MVAPICH (pronounced as “em-vah-pich”) is an open-source MPI software to exploit the novel features and mechanisms of these networking technologies and deliver best performance and scalability to MPI applications. This software is developed in the Network-Based Computing Laboratory (NBCL), headed by Prof. Dhabaleswar K. (DK) Panda.
The MVAPICH2 MPI library supports MPI-3 semantics. This open-source MPI software project started in 2001 and a first high-performance implementation was demonstrated at SuperComputing ’02 conference. After that, this software has been steadily gaining acceptance in the HPC, InfiniBand, Omni-Path, Ethernet/iWARP and RoCE communities. As of March 2022, more than 3,200 organizations (National Labs, Universities and Industry) world-wide (in 89 countries) have registered as MVAPICH users at MVAPICH project web site. There have also been more than 1.56 million downloads of this software from the MVAPICH project site directly. In addition, many InfiniBand, Omni-Path, Ethernet/iWARP and RoCE vendors, server vendors, systems integrators and Linux distributors have been incorporating MVAPICH2 into their software stacks and distributing it. MVAPICH2 distribution is available under BSD licensing.
Several InfiniBand systems using MVAPICH2 have obtained positions in the TOP 500 ranking. The Nov ’21 list includes the following systems: 4th, 10,649,600-core (Sunway TaihuLight) at National Supercomputing Center in Wuxi, China; 13th, 448,448 cores (Frontera) at TACC; 26th, 391,680 cores (ABCI) in Japan; 38st, 570,020 cores (Neurion) in South Korea; 39nd, 556,104 cores (Oakforest-PACS) in Japan; 44th, 367,024 cores (Stampede2) at TACC.
More details on MVAPICH software, users list, mailing lists, sample performance numbers on a wide range of platforms and interconnects, a set of OSU benchmarks, related publications, and other InfiniBand-, RoCE, Omni-Path, and iWARP-related projects (High-Performance Big Data and High-Performance Deep Learning) can be obtained from our website:http://mvapich.cse.ohio-state.edu.
This document contains necessary information for MVAPICH2 users to download, install, test, use, tune and troubleshoot MVAPICH2 2.3.7. We continuously fix bugs and update update this document as per user feedback. Therefore, we strongly encourage you to refer to our web page for updates.
This guide is designed to take the user through all the steps involved in configuring, installing, running and tuning MPI applications over InfiniBand using MVAPICH2 2.3.7.
In Section 3 we describe all the features in MVAPICH2 2.3.7. As you read through this section, please note our new features (highlighted as (NEW)) compared to version 2.3.6. Some of these features are designed in order to optimize specific type of MPI applications and achieve greater scalability. Section 4 describes in detail the configuration and installation steps. This section enables the user to identify specific compilation flags which can be used to turn some of the features on or off. Basic usage of MVAPICH2 is explained in Section 5. Section 6 provides instructions for running MVAPICH2 with some of the advanced features. Section 7 describes the usage of the OSU Benchmarks. In Section 8 we suggest some tuning techniques for multi-thousand node clusters using some of our new features. If you have any problems using MVAPICH2, please check Section 9 where we list some of the common problems people face. Finally, in Sections 11 and 12, we list all important run time parameters, their default values and a short description.
MVAPICH2 (MPI-3 over InfiniBand) is an MPI-3 implementation based on MPICH ADI3 layer. MVAPICH2 2.3.7 is available as a single integrated package (with MPICH 3.2.1). The current release supports ten different underlying transport interfaces, as shown in Figure 1.
MVAPICH2 2.3.7 is compliant with MPI 3 standard. In addition, MVAPICH2 2.3.7 provides support and optimizations for NVIDIA GPU, multi-threading and fault-tolerance (Checkpoint-restart, Job-pause-migration-resume). A complete set of features of MVAPICH2 2.3.7 are indicated below. New features compared to v2.2 are indicated as (NEW).
The MVAPICH2 2.3.7 package and the project also includes the following provisions:
The MVAPICH2 installation process is designed to enable the most widely utilized features on the target build OS by default. The other interfaces, as indicated in Figure 1, can also be selected on Linux. This installation section provides generic instructions for building from a tarball or our latest sources.
In order to obtain best performance and scalability while having flexibility to use a large number of features, the MVAPICH team strongly recommends the use of following interfaces for different adapters: 1) OFA-IB-CH3 interface for all Mellanox InfiniBand adapters, Cray Slingshot 10 or lower, and Rockport Networks hardware, 2) TrueScale (PSM-CH3) interface for all Intel InfiniBand adapters, 3) OFA-RoCE-CH3 interface for all RoCE adapters, 4) OFA-iWARP-CH3 for all iWARP adapters and 5) Shared-Memory-CH3 for single node SMP system and laptop.
Please see the appropriate subsection for specific configuration instructions for the interface-adapter you are targeting.
The MVAPICH2 2.3.7 source code package includes MPICH 3.2.1. All the required files are present as a
single tarball. Download the most recent distribution tarball from:
http://mvapich.cse.ohio-state.edu/downloads
Unpack the tarball and use the standard GNU procedure to compile:
$ tar -xzf mvapich2-2.3.7.tgz
$ cd mvapich2-2.3.7
$ ./configure
$ make
$ make install
We now support parallel make and you can use the -j<num threads> option to speed up the build process. You can use the following example to spawn 4 threads instead of the preceding make step.
$ make -j 4
In order to install a debug build, please use the following configuration option. Please note that using debug builds may impact performance.
$ ./configure --enable-g=all --enable-error-messages=all
$ make
$ make install
These instructions assume you have already installed subversion.
The MVAPICH2 SVN repository is available at:
https://scm.nowlab.cse.ohio-state.edu/svn/mpi/mvapich2/
Please keep in mind the following guidelines before deciding which version to check out:
$ svn co
https://scm.nowlab.cse.ohio-state.edu/svn/mpi/mvapich2/tags/2.3.7
mvapich2
$ svn co https://scm.nowlab.cse.ohio-state.edu/svn/mpi/mvapich2/trunk
mvapich2
The mvapich2 directory under your present working directory contains a working copy of the MVAPICH2 source code. Now that you have obtained a copy of the source code, you need to update the files in the source tree:
$ cd mvapich2
$ ./autogen.sh
This script will generate all of the source and configuration files you need to build MVAPICH2. You will need autoconf version >= 2.67, automake version >= 1.12.3, libtool version >= 2.4
$ ./configure
$ make
$ make install
MVAPICH2 provides the mpirun_rsh/mpispawn framework from MVAPICH distribution. Using mpirun_rsh should provide the fastest startup of your MPI jobs. More details can be found in Section 5.2.1. In addition, MVAPICH2 also includes the Hydra process manager from MPICH-3.2.1. For more details on using Hydra, please refer to Section 5.2.2.
By default, mpiexec uses the Hydra process launcher. Please note that neither mpirun_rsh, nor Hydra require you to start daemons in advance on the nodes used for a MPI job. Both mpirun_rsh and Hydra can be used with any of the eight interfaces of this MVAPICH2 release, as indicated in Figure 1.
Usage: ./configure [OPTION]... [VAR=VALUE]...
To assign environment variables (e.g., CC, CFLAGS...), specify them as VAR=VALUE. See below for descriptions of some of the useful variables.
| RSH_CMD | path to rsh command |
| SSH_CMD | path to ssh command |
| ENV_CMD | path to env command |
| DBG_CMD | path to debugger command |
| XTERM_CMD | path to xterm command |
| SHELL_CMD | path to shell command |
| TOTALVIEW_CMD | path to totalview command |
If you’d like to use SLURM to launch your MPI programs please use the following configure options.
To configure MVAPICH2 to use PMI-1 support in SLURM:
$ ./configure --with-pmi=pmi1 --with-pm=slurm
To configure MVAPICH2 to use PMI-2 support in SLURM:
$ ./configure --with-pmi=pmi2 --with-pm=slurm
To configure MVAPICH2 to use PMIx support in SLURM:
$ ./configure --with-pmi=pmix --with-pm=slurm
MVAPICH2 automatically detects and uses PMI extensions if available from the process manager. To build and install SLURM with PMI support, please follow these steps:
Download the SLURM source tarball for SLURM-15.08.8 from
http://slurm.schedmd.com/download.html.
Download the patch to add PMI Extensions in SLURM from
http://mvapich.cse.ohio-state.edu/download/mvapich/osu-shmempmi-slurm-15.08.8.patch.
$ tar -xzf slurm-15.08.8.tar.gz
$ cd slurm-15.08.8
$ patch -p1 < osu-shmempmi-slurm-15.08.8.patch
$ ./configure --prefix=/path/to/slurm/install
--disable-pam
$ make -j4 && make install && make install-contrib
To configure MVAPICH2 with the modified SLURM, please use:
$ ./configure --with-pm=slurm --with-pmi=pmi2 --with-slurm=/path/to/slurm/install
MVAPICH2 can also be configured with PMIx plugin of SLURM:
$ ./configure --with-pm=slurm --with-pmi=pmix --with-pmix=/path/to/pmix/install
Note that –with-pmix should refer to the pmix/install directory that is used to build SLURM.
Please refer to Section 5.2.3 for information on how to run MVAPICH2 using SLURM.
MVAPICH2 supports PMIx extensions for JSM. To configure MVAPICH2 with PMIx plugin of JSM, please use:
$ ./configure --with-pm=jsm --with-pmi=pmix --with-pmix=/path/to/pmix/install
Note that –with-pmix should refer to the pmix/install directory that is used to build JSM.
MVAPICH2 can also use pmi4pmix library to support JSM. It can be configured as follows:
$ ./configure --with-pm=jsm --with-pmi=pmi4pmix --with-pmi4pmix=/path/to/pmi4pmix/install
Please refer to Section 5.2.5 for information on how to run MVAPICH2 using the Jsrun launcher.
To configure MVAPICH2 with Flux support, please use:
$ ./configure --with-pm=flux --with-flux=/path/to/flux/install
Please refer to Section 5.2.6 for information on how to run MVAPICH2 using Flux.
OpenFabrics (OFA) IB/iWARP/RoCE/Slingshot/Rockport with the CH3 channel is the default interface on Linux. It can be explicitly selected by configuring with:
$ ./configure --with-device=ch3:mrail --with-rdma=gen2
Both static and shared libraries are built by default. In order to build with static libraries only, configure as follows:
$ ./configure --with-device=ch3:mrail --with-rdma=gen2 --disable-shared
To enable use of the TotalView debugger, the library needs to be configured in the following manner:
$ ./configure --with-device=ch3:mrail --with-rdma=gen2 --enable-g=dbg --enable-debuginfo
Configuration Options for OpenFabrics IB/iWARP/RoCE/Slingshot/Rockport
The Berkeley Lab Checkpoint/Restart (BLCR) installation is automatically detected if installed in
the standard location. To specify an alternative path to the BLCR installation, you can either
use:
--with-blcr=<path/to/blcr/installation>
or
--with-blcr-include=<path/to/blcr/headers>
--with-blcr-libpath=<path/to/blcr/library>
The Filesystem in Userspace (FUSE) installation is automatically detected if installed in the
standard location. To specify an alternative path to the FUSE installation, you can either
use:
--with-fuse=<path/to/fuse/installation>
or
--with-fuse-include=<path/to/fuse/headers>
--with-fuse-libpath=<path/to/fuse/library>
SCR caches checkpoint data in storage on the compute nodes of a Linux cluster to provide a fast, scalable checkpoint / restart capability for MPI codes.
The Fault Tolerance Backplane (FTB) installation is automatically detected if installed in the
standard location. To specify an alternative path to the FTB installation, you can either
use:
--with-ftb=<path/to/ftb/installation>
or
--with-ftb-include=<path/to/ftb/headers>
--with-ftb-libpath=<path/to/ftb/library>
This section details the configuration option to enable GPU-GPU communication with the OFA-IB-CH3 interface of the MVAPICH2 MPI library. For more options on configuring the OFA-IB-CH3 interface, please refer to Section 4.4.
The CUDA installation is automatically detected if installed in the standard location. To specify an
alternative path to the CUDA installation, you can either use:
--with-cuda=<path/to/cuda/installation>
or
--with-cuda-include=<path/to/cuda/include>
--with-cuda-libpath=<path/to/cuda/libraries>
In addition to these we have added the following variables to help account for libraries being installed
in different locations:
--with-libcuda=<path/to/directory/containing/libcuda>
--with-libcudart=<path/to/directory/containing/libcudart
Note: If using the PGI compiler, you will need to add the following to your CPPFLAGS and CFLAGS. You’ll also need to use the --enable-cuda=basic configure option to build properly. See the example below.
The support for running jobs across multiple subnets in MVAPICH2 can be enabled at configure time as follows:
$ ./configure --enable-multi-subnet
MVAPICH2 relies on RDMA_CM module to establish connections with peer processes. The RDMA_CM modules shipped some older versions of OFED (like OFED-1.5.4.1), do not have the necessary support to enable communication across multiple subnets. MVAPICH2 is capable of automatically detecting such OFED installations at configure time. If the OFED installation present on the system does not support running across multiple subnets, the configure step will detect this and exit with an error message.
The default CH3 channel provides native support for shared memory communication on stand alone multi-core nodes that are not equipped with InfiniBand adapters. The steps to configure CH3 channel explicitly can be found in Section 4.4. Dynamic Process Management (5.2.7) is currently not supported on stand-alone nodes without InfiniBand adapters.
The Nemesis sub-channel for OFA-IB is now deprecated. It can be built with:
$ ./configure --with-device=ch3:nemesis:ib
Both static and shared libraries are built by default. In order to build with static libraries only, configure as follows:
$ ./configure --with-device=ch3:nemesis:ib --disable-shared
To enable use of the TotalView debugger, the library needs to be configured in the following manner:
$ ./configure --with-device=ch3:nemesis:ib --enable-g=dbg --enable-debuginfo
Configuration options for OFA-IB-Nemesis:
The Berkeley Lab Checkpoint/Restart (BLCR) installation is automatically detected if installed in
the standard location. To specify an alternative path to the BLCR installation, you can either
use:
--with-blcr=<path/to/blcr/installation>
or
--with-blcr-include=<path/to/blcr/headers>
--with-blcr-libpath=<path/to/blcr/library>
The TrueScale (PSM-CH3) interface needs to be built to use MVAPICH2 on Intel TrueScale adapters. It can built with:
$ ./configure --with-device=ch3:psm
Both static and shared libraries are built by default. In order to build with static libraries only, configure as follows:
$ ./configure --with-device=ch3:psm --disable-shared
To enable use of the TotalView debugger, the library needs to be configured in the following manner:
$ ./configure --with-device=ch3:psm --enable-g=dbg --enable-debuginfo
Configuration options for Intel TrueScale PSM channel:
The Omni-Path (PSM2-CH3) interface needs to be built to use MVAPICH2 on Intel Omni-Path adapters. It can built with:
$ ./configure --with-device=ch3:psm
Both static and shared libraries are built by default. In order to build with static libraries only, configure as follows:
$ ./configure --with-device=ch3:psm --disable-shared
To enable use of the TotalView debugger, the library needs to be configured in the following manner:
$ ./configure --with-device=ch3:psm --enable-g=dbg --enable-debuginfo
Configuration options for Intel Omni-Path PSM2 channel:
The use of TCP/IP with Nemesis channel requires the following configuration:
$ ./configure --with-device=ch3:nemesis
Both static and shared libraries are built by default. In order to build with static libraries only, configure as follows:
$ ./configure --with-device=ch3:nemesis --disable-shared
To enable use of the TotalView debugger, the library needs to be configured in the following manner:
$ ./configure --with-device=ch3:nemesis --enable-g=dbg --enable-debuginfo
Additional instructions for configuring with TCP/IP-Nemesis can be found in the MPICH documentation available at: http://www.mcs.anl.gov/research/projects/mpich2/documentation/index.php?s=docs
The use of TCP/IP requires the explicit selection of a TCP/IP enabled channel. The recommended channel is TCP/IP Nemesis (described in Section 4.13). The alternative ch3:sock channel can be selected by configuring with:
$ ./configure --with-device=ch3:sock
Both static and shared libraries are built by default. In order to build with static libraries only, configure as follows:
$ ./configure --with-device=ch3:sock --disable-shared
To enable use of the TotalView debugger, the library needs to be configured in the following manner:
$ ./configure --with-device=ch3:sock --enable-g=dbg --enable-debuginfo
Additional instructions for configuring with TCP/IP can be found in the MPICH documentation available at:
http://www.mpich.org/documentation/guides/
MVAPICH2 supports a unified binary for both OFA and TCP/IP communication through the Nemesis interface.
In order to configure MVAPICH2 for unified binary support, perform the following steps:
$ ./configure --with-device=ch3:nemesis:ib,tcp
You can use mpicc as usual to compile MPI applications. In order to run your application on OFA:
$ mpiexec -f hosts ./a.out -n 2
To run your application on TCP/IP:
$ MPICH_NEMESIS_NETMOD=tcp mpiexec -f hosts ./osu_latency -n 2
The use of Nemesis shared memory channel requires the following configuration.
$ ./configure --with-device=ch3:nemesis
Both static and shared libraries are built by default. In order to build with static libraries only, configure as follows:
$ ./configure --with-device=ch3:nemesis --disable-shared
To enable use of the TotalView debugger, the library needs to be configured in the following manner:
$ ./configure --with-device=ch3:nemesis --enable-g=dbg --enable-debuginfo
Additional instructions for configuring with Shared-Memory-Nemesis can be found in the MPICH
documentation available at:
http://www.mcs.anl.gov/research/projects/mpich2/documentation/index.php?s=docs
MVAPICH2 can be configured and installed with Singularity in the following manner. Note that the following prerequisites must be fulfilled before this step.
Sample Configuration and Installation with Singularity
MVAPICH2 can be configured and installed with Spack. For detailed instruction of installing MVAPICH2
with Spack, please refer to Spack userguide in:
http://mvapich.cse.ohio-state.edu/userguide/userguide_spack/
MVAPICH2 provides a variety of MPI compilers to support applications written in different programming languages. Please use mpicc, mpif77, mpiCC, or mpif90 to compile applications. The correct compiler should be selected depending upon the programming language of your MPI application.
These compilers are available in the MVAPICH2_HOME/bin directory. MVAPICH2 installation directory can also be specified by modifying $PREFIX, then all the above compilers will also be present in the $PREFIX/bin directory.
This section provides instructions on how to run applications with MVAPICH2. Please note that on new multi-core architectures, process-to-core placement has an impact on performance. Please refer to Section 6.5 to learn about running MVAPICH2 library on multi-core nodes.
The MVAPICH team suggests users using this mode of job start-up for all interfaces (including OFA-IB-CH3, OFA-IB-Nemesis, OFA-iWARP-CH3, OFA-RoCE-CH3, TrueScale (PSM-CH3), Omni-Path (PSM2-CH3), Shared memory-CH3, TCP/IP-CH3 and TCP/IP-Nemesis) This mpirun_rsh scheme provides fast and scalable job start-up. It scales to multi-thousand node clusters.
Prerequisites:
Examples of running programs using mpirun_rsh:
$ mpirun_rsh -np 4 n0 n0 n1 n1 ./cpi
This command launches cpi on nodes n0 and n1, two processes per node. By default ssh is used.
$ mpirun_rsh -launcher rsh -np 4 n0 n0 n1 n1 ./cpi
This command launches cpi on nodes n0 and n1, two processes per each node using rsh instead of ssh.
$ mpirun_rsh -launcher srun -np 4 n0 n0 n1 n1 ./cpi This command launches cpi on nodes n0 and n1, two processes per each node using srun instead of ssh. This is usefull on clusters that do not support direct ssh access to compute nodes.
MPIRUN_RSH Hostfile:
$ mpirun_rsh -np 4 -hostfile hosts ./cpi
A list of target nodes may be provided in the file hosts one per line. MPI ranks are assigned in order of the hosts listed in the hosts file or in the order they are passed to mpirun_rsh. i.e., if the nodes are listed as n0 n1 n0 n1, then n0 will have two processes, rank 0 and rank 2; whereas n1 will have rank 1 and 3. This rank distribution is known as “cyclic”. If the nodes are listed as n0 n0 n1 n1, then n0 will have ranks 0 and 1; whereas n1 will have ranks 2 and 3. This rank distribution is known as “block”. A cyclic (one entry per host) hostfile can be modified with the ppn launch option to use a block distribution.
Hostfile Format
The mpirun_rsh hostfile format allows for users to specify hostnames, one per line, optionally with a
multiplier, and HCA specification.
The multiplier allows you to save typing by allowing you to specify blocked distribution of MPI ranks using one line per hostname. The HCA specification allows you to force an MPI rank to use a particular HCA.
The optional components are delimited by a ‘:’. Comments and empty lines are also allowed. Comments start with ‘#’ and continue to the next newline.
When launching in a SLURM or PBS environment the hostfile can be read directly from the resource manager. In this case, a combination of the np and ppn launch options are sufficient. The ppn value of 1 will result in a cyclic distribution, while higher ppn values will provide a block distribution. Note that the number of processes specified by np will always be met, the ppn value will just specify the number of processes to assign to each host consecutively.
$ mpirun_rsh -np 8 -ppn 2 ./cpi
This command launches cpi on all nodes allocated to the SLRUM/PBS job assigning rank 0 and rank 1 on n1, rank 2 and rank 3 on n2, and so on. If those are the only nodes in the job n1 will then recieve rank 3 and 4, n2 will recieve rank 5 and 6, etc.
Specifying Environmental Variables
Many parameters of the MPI library can be configured at run-time using environmental variables. In
order to pass any environment variable to the application, simply put the variable names and values just
before the executable name, like in the following example:
$ mpirun_rsh -np 4 -hostfile hosts ENV1=value ENV2=value ./cpi
Note that the environmental variables should be put immediately before the executable.
Alternatively, you may also place environmental variables in your shell environment (e.g. .bashrc). These will be automatically picked up when the application starts executing.
Note that mpirun_rsh is sensitive to the ordering of the command-line arguments.
There are many different parameters which could be used to improve the performance of applications depending upon their requirements from the MPI library. For a discussion on how to identify such parameters, see Section 8.
Job Launch using MPMD
The mpirun_rsh framework also supports job launching using MPMD mode. It permits the use of
heterogeneous jobs using multiple executables and command line arguments. The following format needs
to be used:
$ mpirun_rsh -config configfile -hostfile hosts
A list of different group of executables must be provided to the job launcher in the file configfile, one per line. The configfile can contain comments. Lines beginning with “#” are considered comments.
For example:
#Config file example
#Launch 4 copies of exe1 with arguments arg1 and arg2
-n 4 : exe1 arg1 arg2
#Launch 2 copies of exe2
-n 2 : exe2
A list of target nodes must be provided in the file hosts one per line and the allocation policy previously described is used.
Please note that this section only gives general information on how to run applications using mpirun_rsh. Please refer to the following sections for more information on how to run the application over various interfaces such as iWARP and RoCE.
Other Options
Other options of mpirun_rsh can be obtained using
$ mpirun_rsh --help
Hydra is the default process manager for MPICH. MVAPICH2 also distributes Hydra along with with mpirun_rsh. Hydra can be used either by using mpiexec or mpiexec.hydra. All interfaces of MVAPICH2 will work using Hydra. The following is an example of running a program using it:
$ mpiexec -f hosts -n 2 ./cpi
The Hydra process manager can be used to launch MPMD jobs. For example the following command:
$ mpiexec -genv FOO=1 -env BAR=1 -n 2 ./exec1 : -env BAR=2 -n 2 ./exec2
The environment variable FOO=1 passed to “-genv” is applied the environment to all executables (i.e. exec1 and exec2). The values BAR=1 applies to exec1 and BAR=2 applies to only exec2.
This process manager has many features. Please refer to the following web page for more details.
http://wiki.mcs.anl.gov/mpich2/index.php/Using_the_Hydra_Process_Manager
SLURM is an open-source resource manager designed by Lawrence Livermore National Laboratory and maintained by SchedMD. SLURM software package and its related documents can be downloaded from: http://www.schedmd.com/
Once SLURM is installed and the daemons are started, applications compiled with MVAPICH2 can be launched by SLURM, e.g.
$ srun -n 2 ./a.out
The use of SLURM enables many good features such as explicit CPU and memory binding. For example, if you have two processes and want to bind the first process to CPU 0 and Memory 0, and the second process to CPU 4 and Memory 1, then it can be achieved by:
$ srun --cpu_bind=v,map_cpu:0,4 --mem_bind=v,map_mem:0,1 -n2 --mpi=none ./a.out
To use PMI-2 with SLURM, please use:
$ srun --mpi=pmi2 -n 2 ./a.out
To use PMIx with SLURM, please use:
$ srun --mpi=pmix -n 2 ./a.out
If PMI-2/PMIx is selected and the installed version of SLURM supports PMI/PMIx, MVAPICH2 will automatically use the extensions.
For more information about SLURM and its features please visit http://www.schedmd.com/
Both mpirun_rsh and mpiexec can take information from the PBS/Torque environment to launch jobs (i.e. launch on nodes found in PBS_NODEFILE).
You can also use MVAPICH2 in a tightly integrated manner with PBS. To do this you can install mvapich2 by adding the –with-pbs option to mvapich2. Below is a snippet from ./configure –help of the hydra process manager (mpiexec) that you will use with PBS/Torque.
–with-pbs=PATH specify path where pbs include directory and lib directory can be found –with-pbs-include=PATH specify path where pbs include directory can be found –with-pbs-lib=PATH specify path where pbs lib directory can be found
For more information on using hydra, please visit the following URL: http://wiki.mpich.org/mpich/index.php/Using_the_Hydra_Process_Manager
Job Step Manager (JSM) is job scheduler developed by IBM. To launch MPI applications with jsrun, use the following commands:
$ bsub -nnodes 2 -G guests -W 240 -Is /usr/bin/tcsh
$ jsrun -a 1 -c ALL_CPUS -g ALL_GPUS --bind=none -n 2
./mpiHello
More information about How to use JSM can be found at the following URL: https://www.ibm.com/support/knowledgecenter/en/SSWRJV_10.1.0/jsm/10.2/base/jsm_kickoff.html
Flux is an open-source resource manager developed at Lawrence Livermore National Laboratory. The Flux software package and its related documents can be downloaded from: https://github.com/flux-framework. To allocate a node and setup Flux, the following comands are used:
$ salloc -N1 -p pdebug
$ srun --pty -N 1 -n 1 --mpi=none flux keygen
$ srun --pty -N 1 -n 1 --mpi=none flux start
Once Flux is setp, applications compiled with MVAPICH2 can be launched by Flux as follows:
$ flux wreckrun -N 1 -n 2 -c 1 ./a.out
MVAPICH2 (OFA-IB-CH3 interface) provides MPI-2 dynamic process management. This feature allows MPI applications to spawn new MPI processes according to MPI-2 semantics. The following commands provide an example of how to run your application.
Please refer to Section 11.71 for information about the MV2_SUPPORT_DPM environment variable.
The MVAPICH2 library can automatically detect iWARP cards and use them with the appropriate settings at run time. This feature deprecates the use of the environment variable MV2_USE_IWARP_MODE which was being used earlier to enable the use of iWARP devices at run time.
All the systems to be used need the following one time setup for enabling RDMA CM usage.
Programs can be executed as follows:
$ mpirun_rsh -np 2 n0 n1 prog
The iWARP interface also provides TotalView debugging and shared library support. Please refer to Section 4.4.
RDMA over Converged Ethernet (RoCE) is supported with the use of the run time environment variable MV2_USE_RoCE.
Programs can be executed as follows:
$ mpirun_rsh -np 2 MV2_USE_RoCE=1 prog
RoCE requires loss-less Ethernet fabric. This requires to configure Ethernet switch to treat RoCE traffic as loss-less. A separate VLAN interface needs to be created on RoCE NIC on all compute nodes and assign a private IP address
In loss-less fabric setup, MVAPICH2 can be run in RoCE mode in following two ways
You would like to run an MPI job using IPoIB but your IB card is not the default interface for IP traffic. Assume that you have a cluster setup as the following:
| #hostname | Eth Addr | IPoIB Addr | |
| compute1 | 192.168.0.1 | 192.168.1.1 | |
| compute2 | 192.168.0.2 | 192.168.1.2 | |
| compute3 | 192.168.0.3 | 192.168.1.3 | |
| compute4 | 192.168.0.4 | 192.168.1.4 | |
The Ethernet addresses are assigned to eth0 and the IPoIB addresses are assigned to the ib0 interface. The host names resolve to the 192.168.0.* addresses.
The most direct way to use the IPoIB network is to populate your hosts file with the IP addresses of the ib0 interfaces.
Example:
$ cat - > hosts
192.168.1.1
192.168.1.2
192.168.1.3
192.168.1.4
$ mpirun_rsh -hostfile hosts -n 4 ./app1
or
$ mpiexec -f hosts -n 4 ./app1
Another way to achieve this is to use the -iface option of hydra. This allows you to have your hosts file to use the host names even though they resolve to the eth0 interface.
Example:
$ cat - > hosts
compute1
compute2
compute3
compute4
$ mpiexec -f hosts -iface ib0 -n 4 ./app1
More information can be found at the following link.
MVAPICH2 contains optimized Lustre ADIO support for the OFA-IB-CH3 interface. The Lustre directory should be mounted on all nodes on which MVAPICH2 processes will be running. Compile MVAPICH2 with ADIO support for Lustre as described in Section 4. If your Lustre mount is /mnt/datafs on nodes n0 and n1, on node n0, you can compile and run your program as follows:
$ mpicc -o perf romio/test/perf.c
$ mpirun_rsh -np 2 n0 n1 <path to perf>/perf -fname /mnt/datafs/testfile
If you have enabled support for multiple file systems, append the prefix “lustre:” to the name of the file. For example:
$ mpicc -o perf romio/test/perf.c
$ mpirun_rsh -np 2 n0 n1 ./perf -fname lustre:/mnt/datafs/testfile
MVAPICH2 provides TotalView support. The following commands provide an example of how to build and run your application with TotalView support. Note: running TotalView requires correct setup in your environment, if you encounter any problem with your setup, please check with your system administrator for help.
All MPI2-functions of MVAPICH2 support the MPI profiling interface. This allows MVAPICH2 to be used
by a variety of profiling libraries for MPI applications.
Two use of profiling libraries will be describe below, Scalasca and mpiP;
Once the installation is done, you will be able to use Scalasca with MVAPICH2.
For more information about Scalasca and its features please visit Scalasca website.
Simply run your MPI application as usual. On running a mpi application, a file with mpiP extension gets created which contains the following information
Prerequisites to install mpiP library: mpiP library has the build dependency on following libraries. Usually, these libraries are installed along with the Linux installation. You may also download these libraries from the specified URLs and install them according to their README file.
Alternative to GNU binutils, libelf and libdwarf can be used for source lookup.
The sample configure command to build mpiP library is given below. Please refer to the mpiP web page for commands specific to your system environment.
./configure LDFLAGS=-L/usr/lib64 LIBS=‘‘-lbfd -liberty’’ --enable-collective-report-default --enable-demangling=GNU --with-cc=mpicc --with-cxx=mpiCC --with-f77=mpif77
To compile the file example.c, use the mpicc built in the Singularity environment as described in
Section 4.15.
$ singularity exec Singularity-Centos-7.img mpicc /path/to/example.c -o
example
The MPI binary (example) can be installed into the container at /usr/bin as follows.
$ sudo singularity copy Singularity-Centos-7.img ./example /usr/bin/
Run the MPI program within the container by using the mpirun_rsh job launcher on the host. As with
the native MVAPICH2 version, different features can be enabled through the use of runtime
variables.
$ mpirun_rsh -np #procs -hostfile hostfile MV2_IBA_HCA=mlx4_0 singularity exec Singularity-Centos-7.img /usr/bin/example
In this section, we present the usage instructions for advanced features provided by MVAPICH2.
In MVAPICH2 2.3.7, run-time variables are used to switch various optimization schemes on and off. Following is a list of optimizations schemes and the control environmental variables, for a full list please refer to the section 11:
Traditionally with mpirun_rsh you have to specify all environment variables that you want visible to the remote MPI processes on the command line. With the –export option of mpirun_rsh this is no longer necessary.
Please note that the -export option does not overwrite variables that are normally already set when you first ssh into the remote node. If you want to export all variables including the ones that are already set you can use the -export-all option.
MVAPICH2 supports the use of configuration values to ease the burden of users when they would like to set and repeatedly use many different environment variables. These can be stored in a configuration file with statements of the form “VARIABLE = VALUE”. Full line comments are supported and begin with the “#” character.
The system configuration file can be placed at /etc/mvapich2.conf while user configuration files are located at “~/.mvapich2.conf” by default. The user configuration file can be specified at runtime by MV2_USER_CONFIG if the user would like to have mvapich2 read from a different location.
The processing of these files can be disabled by the use of the MV2_IGNORE_SYSTEM_CONFIG and MV2_IGNORE_USER_CONFIG.
Run with blocking mode enabled
Do not use user configuration file
MVAPICH2 can be suspended and resumed when using a process launcher that catches and forwards the appropriate signals.
For example, when using mpirun_rsh you can type Ctrl-Z (or send the SIGTSTP signal) at the terminal and the job will suspend. You can then later send the SIGCONT signal to the job and it will continue.
MVAPICH2-CH3 interfaces support architecture specific CPU mapping through the Portable Hardware Locality (hwloc) software package. By default, the HWLOC sources are compiled and built while the MVAPICH2 library is being installed. Users can choose the “–disable-hwloc” parameter while configuring the library if they do not wish to have the HWLOC library installed. However, in such cases, the MVAPICH2 library will not be able to perform any affinity related operations.
There are two major schemes as indicated below. To take advantage of any of these schemes,
the jobs need to run with CPU affinity (MV2_ENABLE_AFFINITY) and shared memory
(MV2_USE_SHARED_MEM) turned on (default). If users choose to set these run-time parameters to 0,
then the kernel takes care of mapping processes to cores and none of these schemes will be
enabled.
To report the process mapping, users can set the environment variable MV2_SHOW_CPU_BINDING to 1 (Section 10.7).
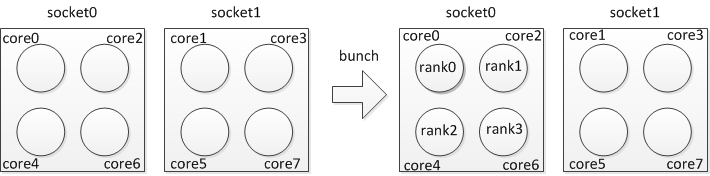
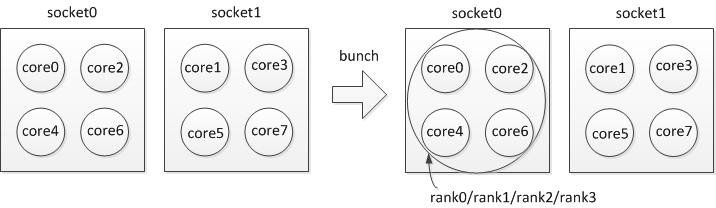
Under this scheme, the HWLOC tool will be used at job-launch time to detect the processor’s micro-architecture, and then generate a suitable cpu mapping string based. Three policies are currently implemented: “bunch”, “scatter”, and “hybrid”. By default, we choose to use the “hybrid” mapping. However, we also allow users to choose a binding policy through the run-time variable, MV2_CPU_BINDING_POLICY. (Section 11.14)
For example, if you want to run 4 processes per node and utilize “bunch” policy on each node, you can specify:
$ mpirun_rsh -np 4 -hostfile hosts MV2_CPU_BINDING_POLICY=bunch ./a.out
The CPU binding will be set as shown in Figure 2.
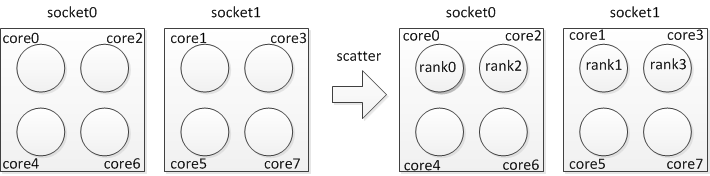
If you want to run 4 processes per node and utilize “scatter” policy on each node, you can specify:
$ mpirun_rsh -np 4 -hostfile hosts MV2_CPU_BINDING_POLICY=scatter ./a.out
The CPU binding will be set as shown in Figure 3.
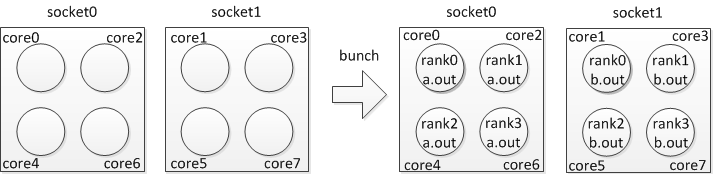
If two applications with four processes each need to share a given node (with eight cores) at the same time with “bunch” policy, you can specify:
$ mpirun_rsh -np 4 -hostfile hosts MV2_CPU_BINDING_POLICY=bunch ./a.out
$ mpirun_rsh -np 4 -hostfile hosts MV2_CPU_BINDING_POLICY=bunch ./b.out
The CPU binding will be set as shown in Figure 4.
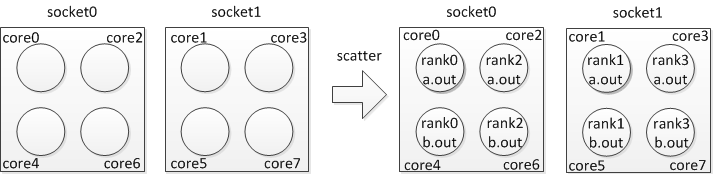
If two applications with four processes each need to share a given node (with eight cores) at the same time with “scatter” policy, you can specify:
$ mpirun_rsh -np 4 -hostfile hosts MV2_CPU_BINDING_POLICY=scatter ./a.out
$ mpirun_rsh -np 4 -hostfile hosts MV2_CPU_BINDING_POLICY=scatter ./b.out
The CPU binding will be set as shown in Figure 5.
The aforementioned binding is based on the core level, meaning each MPI process will be bound to a specific core. Actually, we provide different process binding level. There are three binding levels: “core”, “socket”, and “numanode” (which is designed for some multicore processor with NUMA node unit). We use the “core” as the default binding level, and we also allow users to choose a binding level through the run-time variable, MV2_CPU_BINDING_LEVEL. (Section 11.16) For example, if you want to run 4 processes per node and utilize “socket” as the binding level on each node, you can specify:
$ mpirun_rsh -np 4 -hostfile hosts MV2_CPU_BINDING_LEVEL=socket ./a.out
The CPU binding will be set as shown in Figure 6. Note: because we use “bunch” as the default binding policy, all four processes will be bound to the first socket and each of them can use all four cores in this socket. When the binding policy is “bunch” and the binding level is “socket”, processes will be bound to the same socket until the process number is larger than the core number in the socket.
If you want to run 4 processes per node, utilize “socket” as the binding level and “scatter” as the binding policy, you can specify:
$ mpirun_rsh -np 4 -hostfile hosts MV2_CPU_BINDING_LEVEL=socket MV2_CPU_BINDING_POLICY=scatter ./a.out
The CPU binding will be set as shown in Figure 7.
We have introduced one additional policy called “hybrid” for MV2_CPU_BINDING_POLICY variable. This policy can also be used for hybrid MPI+Threads (OpenMP, pthreads, etc.) applications where each MPI rank additionally spawns multiple threads. The detailed usage of this variable and any additional variables you might need is discussed in Section 6.20.
In addition to MV2_CPU_BINDING_POLICY, we have also provided a new environment variable called MV2_HYBRID_BINDING_POLICY to specify thread specific binding policies. The detailed description and usage of this variable is explained in Section 6.21.
Under the second scheme, users can also use their own mapping to bind processes to CPU’s on modern multi-core systems. The feature is especially useful on multi-core systems, where performance may be different if processes are mapped to different cores. The mapping can be specified by setting the environment variable MV2_CPU_MAPPING (Section 11.13).
For example, if you want to run 4 processes per node and utilize cores 0, 1, 4, 5 on each node, you can specify:
$ mpirun_rsh -np 64 -hostfile hosts MV2_CPU_MAPPING=0:1:4:5 ./a.out
or
$ mpiexec -n 64 -f hosts -env MV2_CPU_MAPPING 0:1:4:5 ./a.out
In this way, process 0 on each node will be mapped to core 0, process 1 will be mapped to core 1, process 2 will be mapped to core 4, and process 3 will be mapped to core 5. For each process, the mapping is separated by a single “:”.
MVAPICH2 supports binding one process to multiple cores in the same node with “,” or “-”. For example:
$ mpirun_rsh -np 64 -hostfile hosts MV2_CPU_MAPPING=0,2,3,4:1:5:6 ./a.out
or
$ mpirun_rsh -np 64 -hostfile hosts MV2_CPU_MAPPING=0,2-4:1:5:6 ./a.out
In this way, process 0 on each node will be mapped to core 0, core 2, core 3, and core 4; process 1 will be mapped to core 1, process 2 will be mapped to core 5, and process 3 will be mapped to core 6. This feature is designed to support the case that one rank process will spawn multiple threads and set thread binding in the program.
Here we provide a table with latency performance of 0 byte and 8KB messages using different CPU mapping schemes. The results show how process binding can affect the benchmark performance. We strongly suggest the consideration of best CPU mapping on multi-core platforms when carrying out benchmarking and performance evaluation with MVAPICH2.
The following measurements were taken on the machine with the dual quad-core 2.53GHz Intel Xeon processors with 12MB L3 shared cache (among cores in one socket). MVAPICH2-2.3.7 was built with gcc-4.4.6 and default configure arguments:
Message Latency | |||
| Core Pair | 0-byte | 8k-byte | Notes
|
| 1,2 | 0.17 us | 1.83 us | same socket, shared L3 cache, best performance |
| 0,1 | 0.17 us | 1.87 us | same socket, shared L3 cache, but core 0 handles interrupts |
| 1,5 | 0.41 us | 3.16 us | different sockets |
| 0,4 | 0.42 us | 3.17 us | different sockets, but core 0 handles interrupts |
MVAPICH2 CH3-based interfaces support LiMIC2 for intra-node communication for medium and large messages to get higher performance. LiMIC2 is also used to optimize intra-node one-sided communication in OFA-IB-CH3 and OFA-iWARP-CH3 interfaces. It is disabled by default because it depends on the LiMIC2 package to be previously installed. As a convenience we have distributed the latest LiMIC2 package (as of this release) with our sources.
To install this package, please take the following steps.
Before using LiMIC2 you’ll need to load the kernel module. If you followed the instructions above you can do this using the following command (LSB init script).
Please note that supplying ‘--sysconfdir=/etc’ in the configure line above told the package to install the init script and an udev rule in the standard location for system packages. Supplying ‘--prefix=/usr’ will also install the headers and libraries in the system path. These are optional but recommended.
Now you can use LiMIC2 with MVAPICH2 by simply supplying the ‘--with-limic2’ option when configuring MVAPICH2. You can run your applications as normal and LiMIC2 will be used by default. To disable it at run time, use the env variable:
$ mpirun_rsh -np 64 -hostfile hosts MV2_SMP_USE_LIMIC2=0 ./a.out
In MVAPICH2, support for shared memory based collectives has been enabled for MPI applications running over OFA-IB-CH3, OFA-iWARP-CH3, TrueScale (PSM-CH3) and Omni-Path (PSM2-CH3) interfaces. Currently, this support is available for the following collective operations:
Optionally, these feature can be turned off at run time by using the following parameters:
Please refer to Section 11 for further details.
In MVAPICH2, support for intra-node topology aware collectives is enabled by default. This feature can be toggled using MV2_ENABLE_TOPO_AWARE_COLLECTIVES (section 11.131). It requires shared memory collectives to be enabled (section 11.93). Supported interfaces include OFA-IB-CH3, OFA-iWARP-CH3, TrueScale (PSM-CH3) and Omni-Path (PSM2-CH3). Currently, this support is available for the following collective operations:
Run-time parameters exist to toggle each one of the supported collective operations. The parameters are :
MVAPICH2 also provides support for topology-aware allreduce with SHArP support for inter-node operations by default. Please refer to Section 6.27 for more details on how to enable this feature.
Please refer to Section 11 for further details.
In MVAPICH2, support for multicast based collectives has been enabled for MPI applications running over OFA-IB-CH3 interface. Currently, this support is available for the following collective operations:
This feature is enabled by default. This can be toggled at runtime by using parameter
MV2_USE_MCAST (section 11.119). This feature is effective when the MPI job is running on more than
the threshold
MV2_MCAST_NUM_NODES_THRESHOLD (section 11.120) number of nodes.
Both RDMA_CM and libibumad based multicast group setup schemes are supported.
RDMA_CM based multicast group setup (enabled by default) can be toggled using the
MV2_USE_RDMA_CM_MCAST (section 11.134) run-time parameter.
If RDMA_CM based mutlicast group setup is disabled/cannot be used, multicast requires the cluster to be installed with libibumad and libibmad libraries as well as have read/write permission for users on /dev/infiniband/umad0 to function properly.
If neither RDMA_CM nor libibumad based group setup for multicast are viable options, then the feature can be disabled using the –disable-mcast configure flag.
In MVAPICH2, we offer new intra-node Zero-Copy designs (using LiMIC2) for the MPI_Gather collective operation based on the LiMIC2 feature. This feature can be used, when the library has been configured to use LiMIC2( 6.6). This feature is disabled by default and can be turned on at runtime by using the parameter MV2_USE_LIMIC_GATHER ( 11.118).
MVAPICH2 has scalable design with InfiniBand connection less transport Unreliable Datagram (UD). Applications can use UD only transport by simply configuring MVAPICH2 with the –enable-hybrid (which is enabled by default) and setting the environment variable MV2_USE_ONLY_UD ( 11.116). In this mode, library does not use any reliable RC connections. This feature eliminates all the overheads associated with RC connections and reduces the memory footprint at large scale.
MVAPICH2 has integrated hybrid transport support for OFA-IB-CH3. This provides the capability to use Unreliable Datagram (UD), Reliable Connection (RC) and eXtended Reliable Connection (XRC) transports of InfiniBand. This hybrid transport design is targeted at emerging clusters with multi-thousand core clusters to deliver best possible performance and scalability with constant memory footprint.
Applications can use Hybrid transport by simply configuring MVAPICH2 with the –enable-hybrid option. In this configuration, MVAPICH2 seamlessly uses UD and RC/XRC connections by default. The use of UD transport can be disabled at run time by setting the environment variable MV2_USE_UD_HYBRID( 11.115) to Zero.
MV2_HYBRID_ENABLE_THRESHOLD ( 11.110) defines the threshold for enabling the hybrid transport. Hybrid mode will be used when the size of the job is greater than or equal to the threshold. Otherwise, it uses default RC/XRC connections.
For a full list of Hybrid environment variables, please refer Section 11.
MVAPICH2 has integrated multi-rail support for OFA-IB-CH3 and OFA-iWARP-CH3 interfaces. Run-time variables are used to specify the control parameters of the multi-rail support; number of adapters with MV2_NUM_HCAS (section 11.33), number of ports per adapter with MV2_NUM_PORTS (section 11.35), and number of queue pairs per port with MV2_NUM_QP_PER_PORT (section 11.37). Those variables are default to 1 if you do not specify them.
Large messages are striped across all HCAs. The threshold for striping is set according to the following
formula:
(MV2_VBUF_TOTAL_SIZE × MV2_NUM_PORTS × MV2_NUM_QP_PER_PORT × MV2_NUM_HCAS).
In addition, there is another parameter MV2_STRIPING_THRESHOLD (section 11.70) which users can
utilize to set the striping threshold directly.
MVAPICH2 also gives the flexibility to balance short message traffic over multiple HCAs in a multi-rail configuration. The run-time variable MV2_SM_SCHEDULING can be used to choose between the various load balancing options available. It can be set to USE_FIRST (Default) or ROUND_ROBIN. In the USE_FIRST scheme, the HCA in slot 0 is always used to transmit the short messages. If ROUND_ROBIN is chosen, messages are sent across all HCAs alternately.
In the following example, we can use multi-rail support with two adapters, using one port per adapter
and one queue pair per port:
$ mpirun_rsh -np 2 n0 n1 MV2_NUM_HCAS=2 MV2_NUM_PORTS=1
MV2_NUM_QP_PER_PORT=1 prog
Using the Hydra process manager, the same can be accomplished by:
$ mpiexec -n 2 -hosts n0,n1 -env MV2_NUM_HCAS 2 -env MV2_NUM_PORTS 1 -env
MV2_NUM_QP_PER_PORT 1 prog
Note that the default values of MV2_NUM_PORTS and MV2_NUM_QP_PER_PORT are 1, so they can be omitted.
$ mpirun_rsh -np 2 n0 n1 MV2_NUM_HCAS=2 prog
Using the Hydra process launcher, the following command can be used:
$ mpiexec -n 2 -hosts n0,n1 -env MV2_NUM_HCAS 2 prog
The user can also select the particular network card(s) that should be used by using the MV2_IBA_HCA environment variable specified in section 11.25. The following is an example of how to run MVAPICH2 in this mode. (In the example “mlx4_0” is the name of the InfiniBand card as displayed by the output of the “ibstat” command).
$ mpirun_rsh -np 2 n0 n1 MV2_IBA_HCA=mlx4_0 prog
If there are multiple HCAs in the system, the user can also selectively use some or all of these HCAs for network operations by using the MV2_IBA_HCA environment variable. Different HCAs are delimited by colons “:”. An example is shown below. In the example “mlx4_0” and “mlx4_1” are the names of the InfiniBand card as displayed by the output of the “ibstat” command. There can be other HCAs in the system as well.
$ mpirun_rsh -np 2 n0 n1 MV2_IBA_HCA=mlx4_0:mlx4_1 prog
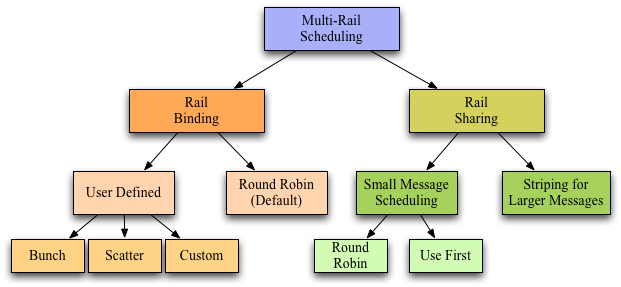
MVAPICH2 now features an enhanced design for multiple rail configurations for OFA-IB-CH3 and OFA-iWARP-CH3 interfaces. It can broadly be explained by the figure given below. In addition to the earlier design where the rails were shared among processes at run time (as depicted under the Rail Sharing banner in the figure below), MVAPICH2 now features a new RAIL BINDING policy which will dedicate a particular rail to a particular process.
The scheduling policies are broadly classified into 2 basic types. Rail Binding and Rail Sharing.
The user defined policies can be set in the following manner by giving appropriate values to the parameter MV2_PROCESS_TO_RAIL_MAPPING (section 11.40)
MVAPICH2 provides system-level rollback-recovery capability based on a coordinated Checkpoint-Restart protocol involving all the application processes.
The following section ( 6.15.1) provides instructions for basic checkpoint/restart operations with MVAPICH2. These require the Berkeley Lab Checkpoint/Restart (BLCR) library in order perform checkpoints of local processes. Then, advanced features are presented. Section 6.15.1 details the usage of the fast-checkpointing scheme based on aggregation. Section 6.15.1 present the support of the new standardized Fault Tolerance Backplane (FTB).
Basic Checkpoint/Restart Scheme: BLCR is a library that allows to take checkpoint of individual processes. Its usage is mandatory to take advantage of the checkpoint/restart functionality in MVAPICH2. Here are the steps that allows the usage of BLCR with MVAPICH2.
Users are strongly encouraged to read the Administrators guide of BLCR, and test the BLCR on the target platform, before using the checkpointing feature of MVAPICH2.
Checkpointing operation
Now, your system is set up to use the Checkpoint/Restart features of MVAPICH2. Several parameters are provided by MVAPICH2 for flexibility in configuration and using the Checkpoint / Restart features. If mpiexec is used as the job start up mechanism, these parameters need to be set in the user’s environment through the BASH shell’s export command, or the equivalent command for other shells. If mpirun_rsh is used as the job start up mechanism, these parameters need to be passed to mpirun_rsh through the command line.
In order to provide maximum flexibility to end users who wish to use the checkpoint/restart features of MVAPICH2, we have provided three different methods that can be used to take checkpoints during the execution of the MPI application. These methods are described as follows:
where PID is the process id of the mpiexec or mpirun_rsh process. In order to simplify the process, the script mv2_checkpoint can be used. This script is available in the same directory as mpiexec and mpirun_rsh.
Restart operation
To restart a job from a manual checkpoint, users need to issue another command of BLCR,
“cr_restart” with the checkpoint file name of the MPI job console as the parameter. Usually, this file is
named
context.<pid>. The checkpoint file name of the MPI job console can be specified when issuing the
checkpoint (see the “cr_checkpoint --help” for more information). Please note that the names of
checkpoint files of the MPI processes will be assigned according to the environment variable
MV2_CKPT_FILE,
($MV2_CKPT_FILE.<number of checkpoint>.<process rank>).
To restart a job from an automatic checkpoint, use cr_restart $MV2_CKPT_FILE.<number of checkpoint>.auto.
If the user wishes to restart the MPI job on a different set of nodes, the host file that was specified along with the “-hostfile” option during job launch phase should be modified accordingly before trying to restart a job with “cr_restart”. This modified “hostfile” must be at the same location and with the same file name as the original hostfile. The mpirun_rsh framework parses the host file again when trying to restart from a checkpoint, and launches the job on the corresponding nodes. This is possible as long as the nodes in which the user is trying to restart has the exact same environment as the one in which the checkpoint was taken (including shared NFS mounts, kernel versions, and user libraries).
For this to function correctly, the user should disable pre-linking on both the source and the destination node. See the FAQ Section of the BLCR userguide for more information.
Please refer to the Section 9.6 for troubleshooting with Checkpoint/Restart.
Write-Aggregation based Fast Checkpointing Scheme: MVAPICH2 provides an enhanced technique that allows fast checkpoint and restart. This scheme, named Aggregation, relies on the Filesystem in Userspace (FUSE) library.
Although Aggregation is optional, its usage is recommended to achieve best performances during checkpoint and restart operations. That is why, if the FUSE library is detected during configuration step, it will be automatically enabled (see section 4.4). Once enabled at configuration step, aggregation scheme can be disabled at run time by setting the environment variable MV2_CKPT_USE_AGGREGATION=0 (see section 11.8 for details).
The following steps need to be done to use FUSE library for aggregation scheme.
If write aggregation has been enabled at configuration time, MVAPICH2 will check the FUSE configuration of each node during startup (FUSE module loaded and fusermount command in the PATH). If one node is not properly configured, then MVAPICH2 will abort. In this case, you need to fix the FUSE configuration of the nodes, or disable aggregation using MV2_CKPT_USE_AGGREGATION=0 to run MVAPICH2.
Fault Tolerance Backplane (FTB) support: MVAPICH2 supports the new standardized Fault Tolerance Backplane (FTB). FTB can be used for Checkpoint-Restart and Job Pause-Migration-Restart Frameworks. Activating FTB support is optional to perform checkpoint/restart operations, but it will allow MVAPICH2 to automatically publish and listen to standardized events through the Fault Tolerance Backplane.
FTB has been developed and standardized by the CIFTS project. It enables faults to be handled in a coordinated and holistic manner in the entire system, providing for an infrastructure which can be used by different software systems to exchange fault-related information.
If using the FTB framework for checkpoint/restart, the following steps need to be done in addition to the above nodes.
Checkpoint/Restart support for the OFA-IB-Nemesis Interface: MVAPICH2 also provides Checkpoint-Restart capabilities for the OFA-IB-Nemesis interface. Currently, this feature can only be used in conjunction with the Hydra process manager. More details on using Hydra to checkpoint an MPI application can be found here.
The Scalable Checkpoint-Restart (SCR) library developed at the Lawrence Livermore National Laboratory (LLNL) enables MPI applications to utilize distributed storage on Linux clusters to attain high file I/O bandwidth for checkpointing and restarting large-scale jobs. With SCR, jobs run more efficiently, lose less work upon a failure, and reduce load on critical shared resources such as the parallel file system and the network infrastructure.
In the current SCR implementation, application checkpoint files are cached in storage local to the compute nodes, and a redundancy scheme is applied such that the cached files can be recovered even after a failure disables part of the system. SCR supports the use of spare nodes such that it is possible to restart a job directly from its cached checkpoint, provided the redundancy scheme holds and provided there are sufficient spares.
The SCR library implements three redundancy schemes which trade of performance, storage space, and reliability:
SCR is integrated into MVAPICH2 to provide Multi-Level checkpointing capabilities to MPI applications in two modes: application-aware mode and transparent mode. The following sub-sections illustrate the steps needed to checkpoint an application using these two schemes.
Application-Aware Multi-Level Checkpointing: In this case, it is assumed that the application knows what data to checkpoint and how to read data from a checkpoint during a restart. It is also assumed that each process writes its checkpoint data in a unique file. For an application to actually write a checkpoint using SCR, the following steps need to be followed.
The following code snippet describes the checkpointing function of a sample MPI application that writes checkpoints using SCR:
The following code snippet describes the SCR-assisted restart mechanism for a sample MPI application:
For more instructions on integrating the SCR APIs into an MPI application, and for information about the various runtime parameters that can be set by the user, please refer to the SCR Userguide.
Transparent Multi-Level Checkpointing :
The benefits of SCR can also be leveraged by applications that do not employ their own Checkpoint-Restart mechanism. The SCR-MVAPICH2 integration makes this possible by using SCR to manage the checkpoints generated by BLCR the basic system-level Checkpointing scheme described in Section 6.15.1. Once MVAPICH2 has been configured with SCR, the steps required to checkpoint and restart a job transparently using BLCR and SCR are the same as what is described in Section 6.15.1. MVAPICH2 uses SCR’s APIs internally to transparently manage checkpoint storage efficiently.
For information about the various SCR-specific runtime parameters that can be set by the user, and for detailed information about the redundancy schemes employed by SCR, please refer to the SCR Userguide.
MVAPICH2 provides a node-level Job Pause-Migration-Restart mechanism for the OFA-IB-CH3 interface, which can be used to migrate MPI processes on a given failing node to a healthy node, selected from a pool of spare hosts provided by the user during job-launch.
This Job Migration framework relies on BLCR and FTB libraries. See subsections in 6.15.1 to set up these libraries. The source and target nodes are required to have these libraries installed in the same path.
The Job Migration framework makes use of BLCR to take a checkpoint of all MPI processes running
on the failing node in question. Users are strongly recommended to either disable “prelinking” feature, or
execute the following command:
$ prelink --undo --all
on all nodes before starting a job that will later be migrated. Please refer to this BLCR web page for complete information: BLCR FAQ.
During job-launch, the list of spare hosts can be provided as input to mpirun_rsh using the -sparehosts option which takes a hostfile as argument.
The following example illustrates a sample MPI job being launched to run with job migration
support:
$ mpirun_rsh -np 4 -hostfile ./hosts -sparehosts
./spare_hosts ./prog
where spare_hosts is a file which contains a list of healthy spare hosts that is needed by the job migration framework.
An actual migration of MPI processes from a failing source node to a target spare node can be triggered using one of two methods - using signals or using the mv2_trigger utility.
For the signal-triggered method, users can manually initiate the migration protocol by issuing a
SIGUSR2 signal to the mpispawn processes running on the source node. This can be done using the
following command:
$ pkill -SIGUSR2 mpispawn
The migration protocol can also be triggered using the simple utility provided with MVAPICH2:
$ $PREFIX/bin/mv2_trigger src
where src is the hostname of the health-deteriorating node from which all MPI processes need to be migrated.
Please note, that the ftb_agent daemon will have to be launched on all the compute nodes and the spare nodes before launching the MPI application, in order to successfully migrate MPI processes. See section 6.15.1 for information about setting up the FTB infrastructure.
MVAPICH2 provides support for run-through stabilization wherein communication failures are not treated as fatal errors. On enabling this capability, MVAPICH2 returns the appropriate error code to a user-set error handler in the event of a communication failure, instead of terminating the entire job. When a process detects a failure when communicating with another process, it will consider the other process as having failed and will no longer attempt to communicate with that process. The user can, however, continue making communication calls to other processes. Any outstanding send or receive operations to a failed process, or wild-card receives (i.e., with MPI_ANY_SOURCE) posted to communicators with a failed process, will be immediately completed with an appropriate error code.
Currently, this support is available only for the OFA-IB-Nemesis and TCP/IP-Nemesis interfaces, when the Hydra process manager is used.
It can be enabled at run-time by:
MVAPICH2 supports network fault recovery by using InfiniBand Automatic Path Migration (APM) mechanism for OFA-IB-CH3 interface. This support is available for MPI applications using OpenFabrics stack and InfiniBand adapters.
To enable this functionality, a run-time variable, MV2_USE_APM (Section 11.72) can be enabled, as
shown in the following example:
$ mpirun_rsh -np 2 n0 n1 MV2_USE_APM=1 ./cpi
or
$ mpiexec -n 2 -hosts n0,n1 -env MV2_USE_APM 1 ./cpi
MVAPICH2 also supports testing Automatic Path Migration in the subnet in the absence of network
faults. This can be controlled by using a run-time variable MV2_USE_APM_TEST (Section 11.73). This
should be combined with MV2_USE_APM as follows:
$ mpirun_rsh -np 2 n0 n1 MV2_USE_APM=1 MV2_USE_APM_TEST=1 ./cpi
or
$ mpiexec -n 2 -hosts n0,n1 -env MV2_USE_APM 1 -env MV2_USE_APM_TEST 1
./cpi
In MVAPICH2, for using RDMA CM the run time variable MV2_USE_RDMA_CM needs to be used as described in 11. This applies to OFA-IB-CH3, OFA-iWARP-CH3 and OFA-RoCE-CH3 interfaces.
In addition to these flags, all the systems to be used need the following one time setup for enabling RDMA CM usage.
Programs can be executed as follows:
$ mpirun_rsh -np 2 n0 n1 MV2_USE_RDMA_CM=1 prog
or
$ mpiexec -n 2 -hosts n0,n1 -env MV2_USE_RDMA_CM 1 prog
MVAPICH2 relies on RDMA_CM to establish connections with peer processes.
The environment variables MV2_RDMA_CM_MULTI_SUBNET_SUPPORT (described in Section 11.84) and MV2_USE_RDMA_CM (described in Section 11.83) must be set to 1 (default value is 0) to enable the multi-subnet support in MVAPICH2.
The multi-subnet support in MVAPICH2 relies on the GID of the underlying InfiniBand HCA to establish communication with peer processes. In some scenarios, the GID may be populated in non-default indices in the GID table resulting in failure when trying to establish communication. In such scenarios, users can take advantage of the MV2_DEFAULT_GID_INDEX environment variable (described in Section 11.82) to point to the correct index in the GID table.
Programs can be executed as follows if GID is populated in the default location:
$ mpirun_rsh -np 2 n0 n1 MV2_USE_RDMA_CM=1
MV2_RDMA_CM_MULTI_SUBNET_SUPPORT=1 prog
If the GID is populated in a non-default location (e.g. 1), programs can be executed as
follows:
$ mpirun_rsh -np 2 n0 n1 MV2_USE_RDMA_CM=1
MV2_RDMA_CM_MULTI_SUBNET_SUPPORT=1 MV2_DEFAULT_GID_INDEX=1 prog
MVAPICH2 binds processes to processor cores for optimal performance. Please refer to Section 6.5 for more details. However, in multi-threaded environments, it might be desirable to have each thread compute using a separate processor core. This is especially true for OpenMP+MPI programs.
In MVAPICH2, processor core mapping is turned off in the following way to enable the application in MPI_THREAD_MULTIPLE threading level if user requested it in MPI_Init_thread. Otherwise, applications will run in MPI_THREAD_SINGLE threading level.
$ mpirun_rsh -np 2 n0 n1 MV2_ENABLE_AFFINITY=0 ./openmp+mpi_app
For QLogic PSM Interface,
$ mpirun_rsh -np 2 n0 n1 MV2_ENABLE_AFFINITY=0 IPATH_NO_CPUAFFINITY=1 ./openmp+mpi_app
Further, to get better performance for applications that use MPI + OpenMP, we recommend binding the OpenMP threads to the processor cores. This can potentially avoid cache effects due to unwanted thread migration. For example, if we consider a Quad-Core processor, with 1 MPI process and 4 OpenMP threads, we recommend binding OpenMP thread 0 to core 0, OpenMP thread 1 to core 1 and so on. This can be achieved by setting the kernel affinity via the following compiler-specific environment variables:
Intel Compilers: On Intel processors, we recommend using the KMP_AFFINITY run-time flag in the following manner:
$ mpirun_rsh -hostfile hostfile -np 1 MV2_ENABLE_AFFINITY=0
OMP_NUM_THREADS=4
KMP_AFFINITY=warnings,compact ./a.out
For more information, please refer to:
http://software.intel.com/sites/products/documentation/studio/
composer/en-us/2011Update/compiler_c/optaps/common/optaps_openmp_thread_affinity.htm
GNU compilers: On both Intel and AMD processors, we recommend using the
GOMP_CPU_AFFINITY run-time flag, in the following manner:
$ mpirun_rsh -hostfile hostfile -np 1 MV2_ENABLE_AFFINITY=0 OMP_NUM_THREADS=4 GOMP_CPU_AFFINITY="0,1,2,3" ./a.out
For more information, please refer to:
(http://gcc.gnu.org/onlinedocs/libgomp/GOMP_005fCPU_005fAFFINITY.html)
We recommend setting the following environment variables:
MV2_CPU_BINDING_POLICY=hybrid
MV2_THREADS_PER_PROCESS=<number of threads per process>
If MV2_THREADS_PER_PROCESS is not specified, OMP_NUM_THREADS is used to
determine the CPU mapping. One core per thread will be allocated to the process. For good
performance, we recommend setting MV2_THREADS_PER_PROCESS equal to or more than
OMP_NUM_THREADS.
Example with 8 MPI processes and 4 OpenMP threads per process:
$ mpirun_rsh -hostfile hostfile -np 8 OMP_NUM_THREADS=4
MV2_CPU_BINDING_POLICY=hybrid MV2_THREADS_PER_PROCESS=4 ./a.out
Knights Landing + Omni-Path Architecture: For systems with Knights Landing and
Omni-Path/PSM2 architecture, we recommend setting the following environment variable:
PSM2_KASSIST_MODE=none in addition.
Example with 8 MPI processes and 4 OpenMP threads per process:
$ mpirun_rsh -hostfile hostfile -np 8 OMP_NUM_THREADS=4
MV2_CPU_BINDING_POLICY=hybrid MV2_THREADS_PER_PROCESS=4
PSM2_KASSIST_MODE=none ./a.out
MV2_CPU_BINDING_POLICY is used to bind MPI ranks to processor cores. We have also introduced a new variable called MV2_HYBRID_BINDING_POLICY that offers several new policies for hybrid and thread specific binding in MPI and MPI+Threads execution environments. The possible bindings offered by this variable are “bunch”, “scatter”, “linear”, “compact”, “spread”, and “numa”.
linear — assigns cores to MPI rank and their corresponding threads linearly. For example, first rank followed by its threads, followed by second rank and its corresponding threads and so on.
Example with 8 MPI processes and 4 OpenMP threads per process on a 68-core KNL processor with “linear” binding policy for threads is shown below:
$ mpirun_rsh -hostfile hostfile -np 8 OMP_NUM_THREADS=4
MV2_CPU_BINDING_POLICY=hybrid MV2_THREADS_PER_PROCESS=4
MV2_HYBRID_BINDING_POLICY=linear ./a.out
This will assign ranks and their corresponding threads linearly.
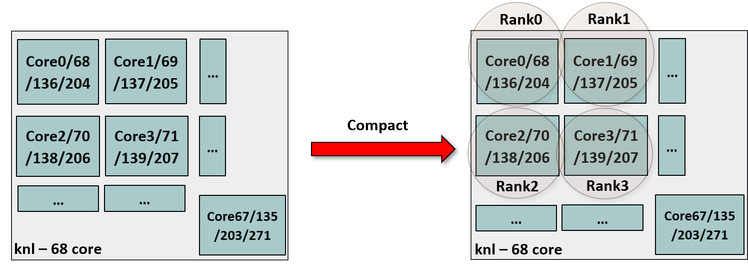
compact — assigns all MPI ranks to physical cores first, and then starts assigning logical cores or hardware threads to each rank’s threads in linear fashion. This policy should only be used when the hyper-/hardware-multithreading is enabled and the user intends to map application threads to hardware threads.
Example with 8 MPI processes and 4 OpenMP threads per process on a 68-core KNL processor with “compact” binding policy for threads is shown below:
$ mpirun_rsh -hostfile hostfile -np 8 OMP_NUM_THREADS=4
MV2_CPU_BINDING_POLICY=hybrid MV2_THREADS_PER_PROCESS=4
MV2_HYBRID_BINDING_POLICY=compact ./a.out
This will assign one physical core per MPI rank. Since there are four hardware-threads per physical core in KNL, the four OpenMP threads of each rank will be mapped to the hardware threads of the corresponding core. The CPU binding will be set as shown in Figure 9.
Note — The correct use of this environment variable mandates that
MV2_CPU_BINDING_POLICY should be set to “hybrid” and MV2_THREADS_PER_PROCESS must
be a positive integer.
spread — This policy ensures that no two MPI ranks get bound to the same physical core. Moreover, this policy will equally distribute the resources (physical cores and hw/threads) among the MPI processes. It also ensures correct bindings on some clusters that have non-trivial vendor specific mappings.
Example with 8 MPI processes and 4 OpenMP threads per process on a 68-core KNL processor with “spread” binding policy for threads is shown below:
$ mpirun_rsh -hostfile hostfile -np 8 OMP_NUM_THREADS=4
MV2_CPU_BINDING_POLICY=hybrid MV2_THREADS_PER_PROCESS=4
MV2_HYBRID_BINDING_POLICY=spread ./a.out
This will assign one MPI rank per physical core avoiding resource contention caused by multiple MPI ranks getting bound to logical cores.
Note — The correct use of this environment variable mandates that
MV2_CPU_BINDING_POLICY should be set to “hybrid” and MV2_THREADS_PER_PROCESS must
be a positive integer.
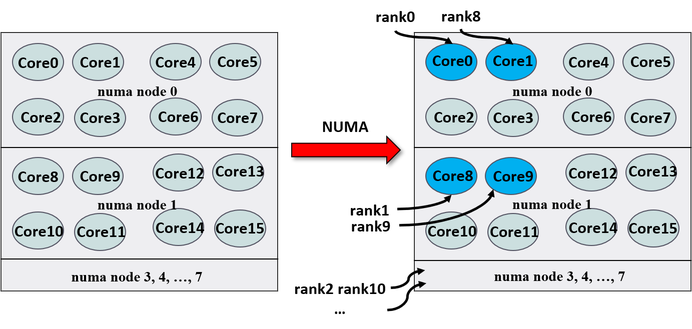
numa — This policy allows for MPI ranks to get bound to different numa domains in a round-robin manner. For example, the first process will be bound to the first physical core of the first numa domain, the second process on to the first physical core of the second numa domain, and so on. It also ensures correct bindings on some clusters that have non-trivial vendor specific mappings.
Example with 16 MPI processes on an AMD EPYC 7551 processor with 8 numa domains with is shown below:
$ mpirun_rsh -hostfile hosts -np 16 MV2_CPU_BINDING_POLICY=hybrid
MV2_HYBRID_BINDING_POLICY=numa ./a.out
Each MPI rank is assigned to a different NUMA domain in a round-robin manner. The CPU binding will be set as shown in Figure 10.
Note — The correct use of this environment variable mandates that
MV2_CPU_BINDING_POLICY should be set to “hybrid” and MV2_THREADS_PER_PROCESS must
be a positive integer (already set by default). Furthermore, this policy is default on AMD EPYC systems
when more than two processes are used.
bunch — assigns cores to MPI ranks in the same way as “bunch” option described earlier. It additionally takes care of the vendor specific non-trivial core mappings. Further, it also ensures that the MPI ranks are bound to the physical cores only.
scatter — similar to “bunch”, this also assigns cores to MPI ranks in “scatter” option given to MV2_CPU_BINDING_POLICY. It additionally takes care of vendor specific non-trivial core mappings. It also ensures that the MPI ranks are only bound to the physical cores only.
Note — “bunch” and “scatter” options for MV2_HYBRID_BINDING_POLICY are recommended to be used as a solution to vendor specific non-trivial mapping issues. These should be considered an alternate to “bunch” or “scatter” given to CPU_BINDING_POLICY.
MVAPICH2 supports hot-spot and congestion avoidance using InfiniBand multi-pathing mechanism. This support is available for MPI applications using OFA-IB-CH3 interface.
To enable this functionality, a run-time variable, MV2_USE_HSAM (Section 11.78) can be enabled, as
shown in the following example:
$ mpirun_rsh -np 2 n0 n1 MV2_USE_HSAM=1 ./cpi
or
$ mpiexec -n 2 -hosts n0,n1 -env MV2_USE_HSAM 1 ./cpi
This functionality automatically defines the number of paths for hot-spot avoidance. Alternatively, the maximum number of paths to be used between a pair of processes can be defined by using a run-time variable MV2_NUM_QP_PER_PORT (Section 11.37).
We expect this functionality to show benefits in the presence of at least partially non-overlapping paths in the network. OpenSM, the subnet manager distributed with OpenFabrics supports LMC mechanism, which can be used to create multiple paths:
$ opensm -l4
will start the subnet manager with LMC value to four, creating sixteen paths between every pair of nodes.
MVAPICH2 CH3-based interface supports MPI communication using NVIDIA GPU device
memory with CUDA versions 4.0 or later. This feature removes the need for the application
developer to explicitly move the data from device memory to host memory before using MPI for
communication. The new support allows direct MPI communication from device memory to
device memory, device memory to host memory and host memory to device memory. It also
supports point-to-point and collective communication using contiguous and non-contiguous MPI
datatypes. It takes advantage of CUDA IPC for intra-node GPU-GPU communication (with CUDA
4.1).
For example, without CUDA support in the MPI library, a typical user might be using the following
sequence of commands to move data from a device memory to another device memory.
…
cudaMemcpy(host_buf, device_buf, size, cudaMemcpyDeviceToDevice);
MPI_Isend(host_buf, size, MPI_CHAR, 1, 100, MPI_COMM_WORLD, req);
…
With the support provided in MVAPICH2 and support of CUDA 4.0 (and later), the user can
achieve the same data movement operation by explicitly specifying MPI calls on device memory.
…
MPI_Isend(device_buf, size, MPI_CHAR, 1, 100, MPI_COMM_WORLD, req);
…
This support can be enabled by configuring MVAPICH2 with --enable-cuda and setting the environment variable MV2_USE_CUDA ( 11.121) to 1 during runtime.
To minimize communication overhead, MVAPICH2 divides copies between device and host into chunks. This can be better tuned for internode transfers with a runtime environment variable MV2_CUDA_BLOCK_SIZE ( 11.122). The default chunk size is 64K (65536). However, higher values of this parameter, such as 256K (262144) and 512K (524288), might deliver better performance if the MPI application uses large messages. The optimal value for this parameter depends on several other factors such as InfiniBand network/adapter speed, GPU adapter characteristics, platform characteristics (processor and memory speed) and amount of memory to be dedicated to the MPI library with GPU support. For different platforms and MPI applications, the users are encouraged to try out different values for this parameter to get best performance.
MVAPICH2 takes advantage of tunable two-dimensional CUDA kernel for packing/unpacking data
when MPI vector datatype is used in communication involving GPU memory. The CUDA thread
block size and dimensions are automatically tuned based on the dimensions of the vector.
Users can also control the number of CUDA threads per block using the runtime parameter:
MV2_CUDA_KERNEL_VECTOR_TIDBLK_SIZE (default value is 1024) ( 11.123). They can adjust the
number of threads operating on each data block of the vector using
MV2_CUDA_KERNEL_VECTOR_YSIZE (tuned based on vector size) ( 11.124).
GPU Affinity: When multiple GPUs are present on a node, users might want to set the MPI process affinity to a particular GPU using cuda calls like cudaSetDevice(). This can be done after MPI_Init based on MPI rank of the process or before MPI_Init using the local rank of a process obtained from an environment variable MV2_COMM_WORLD_LOCAL_RANK.
There is now a front end to mpirun_rsh that aims for compatibility with mpiexec usage as recommended by the MPI standard. This front end is can be used by calling mpiexec.mpirun_rsh.
The main differences between this and mpirun_rsh is that this front end doesn’t require you to specify hosts or environment variables on the command line. Also, the host file options is -f as opposed to -hostfile.
Run 4 instances of CPI on localhost:
$ mpiexec.mpirun_rsh -n 4 ./cpi
Run 4 instances of CPI on the nodes specified by hostfile:
$ mpiexec.mpirun_rsh -n 4 -f hostfile ./cpi
If the hostfile isn’t given and mpiexec.mpirun_rsh finds the appropriate slurm environment variables set, mpiexec will use these to determine which nodes the applications should be launched on.
Please note that processes are assigned in a block fashion by slurm so all the processes will run on the same node if possible.
Run 4 instances of CPI on up to 4 different nodes (but maybe only 1) allocated by “salloc”:
$ salloc -N 4
$ mpiexec.mpirun_rsh -n 4 ./cpi
Same thing as above but only allocating the minimum number of nodes needed to run 4 tasks:
$ salloc -n 4
$ mpiexec.mpirun_rsh ./cpi
Run 4 instances of CPI on 4 different nodes allocated by “salloc”:
$ salloc -N 4 --ntasks-per-node=1
$ mpiexec.mpirun_rsh -n 4 ./cpi
If the hostfile isn’t given and mpiexec.mpirun_rsh finds the PBS_NODEFILE environment variable set, mpiexec will use this to locate the host file.
MVAPICH2 supports compiling and running MPI applications with Intel Trace Analyzer and Collector (ITAC), so that the MPI calls in an execution can be traced, and the logs can be used for functionality or performance analysis. The following steps need to be done to make an MPI application work with ITAC.
$ source /opt/intel/itac/8.1.4/intel64/bin/itacvars.sh
or simply export the only variable of VTune root that needed by MVAPICH2:
$ export VT_ROOT=/opt/intel/itac/8.1.4
$ mpicc -itac -o cpi cpi.c
If configure/Makefile or other building scripts are employed, you should append “-itac” to the compiling and linking options such as “CFLAGS”. For example:
$ ./configure CC=mpicc CFLAGS=-itac && make
The advanced usage of ITAC can be found at: https://software.intel.com/en-us/intel-trace-analyzer.
This section describes the procedure to take advantage of the High Bandwidth Memory (MCDRAM) available with the Intel Knights Landing processor. The method discussed here is basic and does not require modifications to the user application or MPI library.
Allocating Memory on MCDRAM
In order to do all the memory allocations including application buffers and/or internal buffers of MVAPICH2, one can use the numactl system call. This is beneficial when KNL is configured in Flat/Hybrid mode where MCDRAM can be viewed as separate NUMA node.
Step 1: Verify that KNL is configured in Flat/Hybrid mode. One can execute the numactl -H command to verify this. A sample output is also given below. As can be seen from the sample output, when KNL is in Flat-mode NUMA node 0 consists of all the processor cores and DDR memory ( approximately 96GB in size). NUMA node 1 consists of only the MCDRAM (approximately 16GB in size).
$ numactl -H
Step 2: Executing applications to take advantage of MCDRAM.
All memory allocations made by the application as well as MVAPICH2 can be redirected to MCDRAM by prepending numactl –membind <MCDRAM_numa_node> to the job invocation. An example of the same is given below.
$ numactl --membind 1 mpirun_rsh -np 2 -hostfile hosts
osu_latency
Viewing MCDRAM Allocations
To verify that the allocations are indeed being done on the MCDRAM, the numastat -p <pid> command can be used where “pid” refers to the process ID of one of the application processes. An example of the same is given below.
Note that the pages are not allocated until the memory is actually “touched” by the application and/or the MVAPICH2 MPI library. Thus, ‘numastat’ will only report a difference in the amount of memory after the memory is touched.
$ numastat -p 21356
In MVAPICH2, support for SHArP-based collectives has been enabled for MPI applications running over OFA-IB-CH3 interface. Currently, this support is available for the following collective operations:
This feature is disabled by default at configuration time. To use this feature, you need to use --enable-sharp configuration option and specify the path to SHArP installation location by adding the paths to LDFLAGS and CFLAGS. Also, -lsharp and -lsharp_coll flags must be added to LDFLAGS. See the example below.
Please note that SHArP library is a part of HPCX Software Toolkit and the network must be equipped with Mellanox Switch-IB2. Currently, MVAPICH2 supports SHArP library of HPCX v1.7 and v1.8.
Note that the various SHArP related daemons (SHArP Aggregation Manager - sharpam and the local SHArP daemon - sharpd must be installed, setup and running for SHArP support in MVAPICH2 to work properly. This can be verified by running the sharp_hello program available in the “bin” sub-folder of the SHArP installation directory.
This feature is turned off by default at runtime and can be turned on at runtime by using parameter MV2_ENABLE_SHARP=1 ( 11.128). Collective tuning has been done to ensure the best performance.
When using HPCX v1.7, we recommend setting SHARP_COLL_ENABLE_GROUP_TRIM=0 environment variable. Note that if you are using mpirun_rsh you need to add -export option to make sure that environment variable is exported correctly. This environment variable is a part of SHArP library. Please refer to SHArP userguide for more information.
If you have arrived at this point, you have successfully installed MVAPICH2. Congratulations!! The OSU benchmarks should already be built and installed along with MVAPICH2. Look for them under $prefix/libexec/mvapich2. Sample performance numbers for these benchmarks on representative platforms with InfiniBand, iWARP and RoCE adapters are also included on our projects’ web page. You are welcome to compare your performance numbers with our numbers. If you see any big discrepancy, please let us know by sending an email to mvapich-discuss@cse.ohio-state.edu.
The benchmarks provided are:
| MPI-1, MPI-2 and MPI-3
| |
| osu_bibw | Bidirectional Bandwidth Test |
| osu_bw | Bandwidth Test |
| osu_latency | Latency Test |
| osu_latency_mt | Multi-threaded Latency Test |
| osu_mbw_mr | Multiple Bandwidth / Message Rate Test |
| osu_multi_lat | Multi-pair Latency Test |
| osu_allgather | MPI_Allgather Latency Test |
| osu_allgatherv | MPI_Allgatherv Latency Test |
| osu_allreduce | MPI_Allreduce Latency Test |
| osu_alltoall | MPI_Alltoall Latency Test |
| osu_alltoallv | MPI_Alltoallv Latency Test |
| osu_barrier | MPI_Barrier Latency Test |
| osu_bcast | MPI_Bcast Latency Test |
| osu_gather | MPI_Gather Latency Test |
| osu_gatherv | MPI_Gatherv Latency Test |
| osu_reduce | MPI_Reduce Latency Test |
| osu_reduce_scatter | MPI_Reduce_scatter Latency Test |
| osu_scatter | MPI_Scatter Latency Test |
| osu_scatterv | MPI_Scatterv Latency Test |
| MPI-2 and MPI-3 only
| |
| osu_acc_latency | Accumulate Latency Test with Active/Passive Synchronization |
| osu_get_bw | One-Sided Get Bandwidth Test with Active/Passive Synchronization |
| osu_get_latency | One-Sided Get Latency Test with Active/Passive Synchronization |
| osu_latency_mt | Multi-threaded Latency Test |
| osu_put_bibw | One-Sided Put Bidirectional Test with Active Synchronization |
| osu_put_bw | One-Sided Put Bandwidth Test with Active/Passive Synchronization |
| osu_put_latency | One-Sided Put Latency Test with Active/Passive Synchronization |
| MPI-3 only
| |
| osu_cas_latency | One-Sided Compare_and_swap Latency Test with Active/Passive Synchronization |
| osu_fop_latency | One-Sided Fetch_and_op Latency Test with Active/Passive Synchronization |
| osu_get_acc_latency | One-Sided Get_accumulate Latency Test with Active/Passive Synchronization |
| osu_iallgather | MPI_Iallgather Latency Test |
| osu_iallgatherv | MPI_Iallgatherv Latency Test |
| osu_iallreduce | MPI_Iallreduce Latency Test |
| osu_ialltoall | MPI_Ialltoall Latency Test |
| osu_ialltoallv | MPI_Ialltoallv Latency Test |
| osu_ialltoallw | MPI_Ialltoallw Latency Test |
| osu_ibarrier | MPI_Ibarrier Latency Test |
| osu_ibcast | MPI_Ibcast Latency Test |
| osu_igather | MPI_Igather Latency Test |
| osu_igatherv | MPI_Igatherv Latency Test |
| osu_ireduce | MPI_Ireduce Latency Test |
| osu_iscatter | MPI_Iscatter Latency Test |
| osu_iscatterv | MPI_Iscatterv Latency Test |
More information about the benchmarks can be found at http://mvapich.cse.ohio-state.edu/benchmarks/. You can also check this link for updates to the benchmarks.
The OSU Benchmarks can also be downloaded as a separate package from here. You can build the benchmarks using the following steps if mpicc is in your PATH. For example:
$ ./configure --prefix=<path-to-install> && make && make install
If mpicc is not in your path or you would like to use another particular version you can explicitly tell configure by setting CC. For example:
$ ./configure CC=/path/to/special/mpicc --prefix=<path-to-install> &&
make && make install
Configure will detect whether your library supports MPI-2, MPI-3 and compile the corresponding benchmarks. The benchmarks will be installed under $prefix/libexec/osu-micro-benchmarks.
CUDA Extensions to OMB can be enabled by configuring the benchmark suite with –enable-cuda option as shown below. Similarly, OpenACC Extensions can be enabled by specifying the –enable-openacc option. The MPI library used should be able to support MPI communication from buffers in GPU Device memory.
$ ./configure CC=/path/to/mpicc
--enable-cuda
--with-cuda-include=/path/to/cuda/include
--with-cuda-lib=/path/to/cuda/lib
$ make
$ make install
The OSU Benchmarks are run in the same manner as other MPI Applications. The following examples will use mpirun_rsh as the process manager. Please see section 5.2 for more information on running with other process managers.
Inter-node latency and bandwidth: The following example will measure the latency and bandwidth of communication between node1 and node2.
$ mpirun_rsh -np 2 node1 node2 ./osu_latency
$ mpirun_rsh -np 2 node1 node2 ./osu_bw
Intra-node latency and bandwidth: The following example will measure the latency and bandwidth of communication inside node1 on different cores. This assumes that you have at least two cores (or processors) in your node.
$ mpirun_rsh -np 2 node1 node1 ./osu_latency
$ mpirun_rsh -np 2 node1 node1 ./osu_bw
The OSU message rate benchmark reports the rate at which messages can be sent between two nodes. It is advised that it should be run in a configuration that utilizes multiple pairs of communicating processes on two nodes. The following example measures the message rate on a system with two nodes, each with four processor cores.
$ mpirun_rsh -np 8 -hostfile mf ./osu_mbw_mr
Where hostfile “mf” has the following contains:
node1
node1
node1
node1
node2
node2
node2
node2
By default, the OSU collective benchmarks report the average communication latencies for a given collective operation, across various message lengths. Additionally, the benchmarks offer the following options:
If a user wishes to measure the communication latency of a specific collective operation, say, MPI_Alltoall, with 16 processes, we recommend running the osu_alltoall benchmark in the following manner:
$ mpirun_rsh -np 16 -hostfile mf ./osu_alltoall
Where hostfile “mf” has the following contains:
node1
node1
node1
node1
node1
node1
node1
node1
node1
node2
node2
node2
node2
node2
node2
node2
node2
The following benchmarks have been extended to evaluate performance of MPI communication from and to buffers on NVIDIA GPU devices.
| osu_bibw | Bidirectional Bandwidth Test |
| osu_bw | Bandwidth Test |
| osu_latency | Latency Test |
| osu_latency_mt | Multi-threaded Latency Test |
| osu_mbw_mr | Multiple Bandwidth / Message Rate Test |
| osu_multi_lat | Multi-pair Letency Test |
| osu_put_latency | Latency Test for Put |
| osu_get_latency | Latency Test for Get |
| osu_put_bw | Bandwidth Test for Put |
| osu_get_bw | Bandwidth Test for Get |
| osu_put_bibw | Bidirectional Bandwidth Test for Put |
| osu_acc_latency | Latency Test for Accumulate |
| osu_cas_latency | Latency Test for Compare and Swap |
| osu_fop_latency | Latency Test for Fetch and Op |
| osu_allgather | MPI_Allgather Latency Test |
| osu_allgatherv | MPI_Allgatherv Latency Test |
| osu_allreduce | MPI_Allreduce Latency Test |
| osu_alltoall | MPI_Alltoall Latency Test |
| osu_alltoallv | MPI_Alltoallv Latency Test |
| osu_bcast | MPI_Bcast Latency Test |
| osu_gather | MPI_Gather Latency Test |
| osu_gatherv | MPI_Gatherv Latency Test |
| osu_reduce | MPI_Reduce Latency Test |
| osu_reduce_scatter | MPI_Reduce_scatter Latency Test |
| osu_scatter | MPI_Scatter Latency Test |
| osu_scatterv | MPI_Scatterv Latency Test |
| osu_iallgather | MPI_Iallgather Latency Test |
| osu_iallreduce | MPI_Iallreduce Latency Test |
| osu_ialltoall | MPI_Ialltoall Latency Test |
| osu_ibcast | MPI_Ibcast Latency Test |
| osu_igather | MPI_Igather Latency Test |
| osu_ireduce | MPI_Ireduce Latency Test |
| osu_iscatter | MPI_Iscatter Latency Test |
Each of the pt2pt benchmarks takes two input parameters. The first parameter indicates the location of the buffers at rank 0 and the second parameter indicates the location of the buffers at rank 1. The value of each of these parameters can be either ’H’ or ’D’ to indicate if the buffers are to be on the host or on the device, respectively. When no parameters are specified, the buffers are allocated on the host.
The collective benchmarks will use buffers allocated on the device if the -d option is used otherwise the buffers will be allocated on the host.
If both CUDA and OpenACC support is enabled, you can switch between using CUDA and OpenACC to allocate your device buffers by specifying the ’-d cuda’ or ’-d openacc’ option to the benchmark. Please use the ’-h’ option for more info.
GPU affinity for processes is set before MPI_Init is called. The process rank on a node is normally used to do this and different MPI launchers expose this information through different environment variables. The benchmarks use an environment variable called LOCAL_RANK to get this information. The script like get_local_rank provided alongside the benchmarks can be used to export this environment variable when using mpirun_rsh. This can be adapted to work with other MPI launchers and libraries.
Examples:
$ mpirun_rsh -np 2 host0 host0 MV2_USE_CUDA=1 get_local_rank ./osu_latency D D
In this run, assuming host0 has two GPU devices, the latency test allocates buffers on GPU device 0 at rank 0 and on GPU device 1 at rank 1.
$ mpirun_rsh -np 2 host0 host1 MV2_USE_CUDA=1 get_local_rank ./osu_bw D H
In this run, the bandwidth test allocates buffers on the GPU device at rank 0 (host0) and on the host at rank 1 (host1).
The following benchmarks have been extended to evaluate performance of MPI communication from and to buffers allocated using CUDA Managed Memory.
| osu_bibw | Bidirectional Bandwidth Test |
| osu_bw | Bandwidth Test |
| osu_latency | Latency Test |
| osu_mbw_mr | Multiple Bandwidth / Message Rate Test |
| osu_multi_lat | Multi-pair Letency Test |
| osu_allgather | MPI_Allgather Latency Test |
| osu_allgatherv | MPI_Allgatherv Latency Test |
| osu_allreduce | MPI_Allreduce Latency Test |
| osu_alltoall | MPI_Alltoall Latency Test |
| osu_alltoallv | MPI_Alltoallv Latency Test |
| osu_bcast | MPI_Bcast Latency Test |
| osu_gather | MPI_Gather Latency Test |
| osu_gatherv | MPI_Gatherv Latency Test |
| osu_reduce | MPI_Reduce Latency Test |
| osu_reduce_scatter | MPI_Reduce_scatter Latency Test |
| osu_scatter | MPI_Scatter Latency Test |
| osu_scatterv | MPI_Scatterv Latency Test |
In addition to support for communications to and from GPU memories allocated using CUDA or OpenACC, we now provide additional capability of performing communications to and from buffers allocated using the CUDA Managed Memory concept. CUDA Managed (or Unified) Memory allows applications to allocate memory on either CPU or GPU memories using the cudaMallocManaged() call. This allows user oblivious transfer of the memory buffer between the CPU or GPU. Currently, we offer benchmarking with CUDA Managed Memory using the tests mentioned above. These benchmarks have additional options: ”M” allocates a send or receive buffer as managed for point to point communication. ”-d managed” uses managed memory buffers to perform collective communications
MVAPICH2 provides many different parameters for tuning performance for a wide variety of platforms and applications. This section deals with tuning CH3-based interfaces. These parameters can be either compile time parameters or runtime parameters. Please refer to Section 8 for a complete description of all these parameters. In this section we classify these parameters depending on what you are tuning for and provide guidelines on how to use them.
MVAPICH2 internally detects the heterogeneity of the cluster in terms of processor and network interface type. Set parameter MV2_HOMOGENEOUS_CLUSTER to 1 to skip this detection, if the user already knows that cluster is homogeneous.
MVAPICH2 has several advanced features to speed up launching jobs on HPC clusters. There are several launcher-agnostic and launcher-specific parameters that can be used to get the best job startup performance. More details about these designs can be obtained from: http://mvapich.cse.ohio-state.edu/performance/job-startup/
The following parameters affect memory requirements for each QP.
MV2_DEFAULT_MAX_SEND_WQE and MV2_DEFAULT_MAX_RECV_WQE control the maximum number of WQEs per QP and MV2_MAX_INLINE_SIZE controls the maximum inline size. Reducing the values of these two parameters leads to less memory consumption. They are especially important for large scale clusters with a large amount of connections and multiple rails.
These two parameters are run-time adjustable. Please refer to Sections 11.18 and 11.30 for details.
The following parameters are important in tuning the memory requirements for adaptive rdma fast path feature.
MV2_RDMA_FAST_PATH_BUF_SIZE is the size of each buffer used in RDMA fast path communication.
MV2_NUM_RDMA_BUFFER is number of buffers used for the RDMA fast path communication.
On the other hand, the product of MV2_RDMA_FAST_PATH_BUF_SIZE and
MV2_NUM_RDMA_BUFFER generally is a measure of the amount of memory registered for eager
message passing. These buffers are not shared across connections.
The main environmental parameters controlling the behavior of the Shared Receive Queue design are:
MV2_SRQ_MAX_SIZE is the maximum size of the Shared Receive Queue (default 4096). You may
increase this to value 8192 if the application requires very large number of processors. The application will
start by only using MV2_SRQ_SIZE buffers (default 256) and will double this value on every SRQ limit
event(upto MV2_SRQ_MAX_SIZE). For long running applications this re-size should show little effect. If
needed, the MV2_SRQ_SIZE can be increased to 1024 or higher as needed for applications.
MV2_SRQ_LIMIT defines the low water-mark for the flow control handler. This can be reduced if your
aim is to reduce the number of interrupts.
MVAPICH2 now supports the eXtended Reliable Connection (XRC) transport available in recent Mellanox HCAs. This transport helps reduce the number of QPs needed on multi-core systems. Set MV2_USE_XRC (11.101) to use XRC with MVAPICH2.
MVAPICH2 uses shared memory communication channel to achieve high-performance message passing
among processes that are on the same physical node. The two main parameters which are used for tuning
shared memory performance for small messages are SMP_QUEUE_LENGTH (Section 11.106), and
SMP_EAGER_SIZE (Section 11.105). The two main parameters which are used for tuning shared
memory performance for large messages are SMP_SEND_BUF_SIZE (Section 11.108) and
SMP_NUM_SEND_BUFFER (Section 11.107).
SMP_QUEUE_LENGTH is the size of the shared memory buffer which is used to store outstanding small and control messages. SMP_EAGER_SIZE defines the switch point from Eager protocol to Rendezvous protocol.
Messages larger than SMP_EAGER_SIZE are packetized and sent out in a pipelined manner.
SMP_SEND_BUF_SIZE is the packet size, i.e. the send buffer size. SMP_NUM_SEND_BUFFER is the
number of send buffers.
MVAPICH2 uses on-demand connection management to reduce the memory usage of MPI library.
There are 4 parameters to tune connection manager: MV2_ON_DEMAND_THRESHOLD
(Section 11.43),
MV2_CM_RECV_BUFFERS (Section 11.10), MV2_CM_TIMEOUT (Section 11.12), and
MV2_CM_SPIN_COUNT (Section 11.11). The first one applies to OFA-IB-CH3 and OFA-iWARP-CH3
interfaces and the other three only apply to OFA-IB-CH3 interface.
MV2_ON_DEMAND_THRESHOLD defines threshold for enabling on-demand connection management scheme. When the size of the job is larger than the threshold value, on-demand connection management will be used.
MV2_CM_RECV_BUFFERS defines the number of buffers used by connection manager to establish new connections. These buffers are quite small and are shared for all connections, so this value may be increased to 8192 for large clusters to avoid retries in case of packet drops.
MV2_CM_TIMEOUT is the timeout value associated with connection management messages via UD channel. Decreasing this value may lead to faster retries but at the cost of generating duplicate messages.
MV2_CM_SPIN_COUNT is the number of the connection manager polls for new control messages from UD channel for each interrupt. This may be increased to reduce the interrupt overhead when many incoming control messages from UD channel at the same time.
MVAPICH2 uses shared memory to optimize the performance for many collective operations: MPI_Allreduce, MPI_Reduce, MPI_Barrier, and MPI_Bcast.
We use shared-memory based collective for most small and medium sized messages and fall back to the
default point-to-point based algorithms for very large messages. The upper-limits for shared-memory based
collectives are tunable parameters that are specific to each collective operation. We have variables such as
MV2_SHMEM_ALLREDUCE_MSG (11.57), MV2_SHMEM_REDUCE_MSG (11.63) and
MV2_SHMEM_BCAST_MSG (11.59), for MPI_Allreduce, MPI_Reduce and MPI_Bcast collective
operations. The default values for these variables have been set through experimental analysis
on some of our clusters and a few large scale clusters, such as the TACC Ranger. Users can
choose to set these variables at job-launch time to tune the collective algorithms on different
platforms.
MVAPICH2 supports a 2-level point-to-point tree-based “Knomial” algorithm for small messages for the MPI_Bcast operation. MVAPICH2 also offers improved designs that deliver better performance for medium and large message lengths.
In this release, we have introduced new 2-level algorithms for MPI_Reduce and MPI_Allreduce operations, along the same lines as MPI_Bcast. Pure Shared-memory based algorithms cannot be used for larger messages for reduction operations, because the node-leader processes become the bottleneck, as they have to perform the reduction operation on the entire data block. We now rely on shared-memory algorithms for MPI_Reduce and MPI_Allreduce for message sizes set by the thresholds MV2_SHMEM_ALLREDUCE_MSG (11.57), MV2_SHMEM_REDUCE_MSG (11.63), the new 2-level algorithms for medium sized messages and the default point-to-point based algorithms for large messages. We have introduced two new run-time variables MV2_ALLREDUCE_2LEVEL_MSG (11.1) and MV2_REDUCE_2LEVEL_MSG (11.53) to determine when to fall back to the default point-to-point based algorithms.
MVAPICH2 supports two new optimized algorithms for MPI_Gather and MPI_Scatter operations – the “Direct” and the multi-core aware “2-level” algorithms. Both these algorithms perform significantly better than the default binomial-tree pattern. The “Direct” algorithm is however inherently not very scalable and can be used when the communicator size is less than 1K processes. We switch over to the 2-level algorithms for larger system sizes. For MPI_Gather, we use different algorithms depending of the system size. For small system sizes (up to 386 cores), we use the “2-level” algorithm following by the “Direct” algorithm. For medium system sizes (up to 1k), we use “Binomial” algorithm following by the “Direct” algorithm. It’s possible to set the switching point between algorithms using the run-time parameter MV2_GATHER_SWITCH_PT (11.96). For MPI_Scatter, when the system size is lower than 512 cores, we use the “Binomial” algorithm for small message sizes following by the “2-level” algorithm for medium message sizes and the “Direct” algorithm for large message sizes. Users can define the threshold for small and medium message sizes using the run-time parameters MV2_SCATTER_SMALL_MSG (11.97) and MV2_SCATTER_MEDIUM_MSG (11.98). Users can also choose to use only one of these algorithms by toggling the run-time parameters 11.76 and 11.99 for MPI_Gather and 11.77 and 11.100 for MPI_Scatter.
Process placement has a significant impact on performance of applications. Depending on your application communication patterns, various process placements can result in performance gains. In Section 6.5, we have described the usage of “bunch” and “scatter” placement modes provided by MVAPICH2. Using these modes, one can control the placement of processes within a particular node. Placement of processes across nodes can be controlled by adjusting the order of MPI ranks. For example, the following command launches jobs in block fashion.
$ mpirun_rsh -np 4 n0 n0 n1 n1 MV2_CPU_BINDING_POLICY=bunch ./a.out
The following command launches jobs in a cyclic fashion.
$ mpirun_rsh -np 4 n0 n1 n0 n1 MV2_CPU_BINDING_POLICY=scatter ./a.out
We have noted that the HPL (High-Performance Linpack) benchmark performs better when using block distribution.
MVAPICH2 uses HugePages(2MB) by default for communication buffers if they are configured on the system. The run-time variable, MV2_USE_HUGEPAGES( 11.109) can be used to control the behavior of this feature.
In order to use HugePages, Make sure HugePages are configured on all nodes. The number of
HugePages can be configured by setting vm.nr_hugepages kernel parameter to a suitable value. For
example, to allocate a 1GB HugePage pool, execute(as root):
$ echo 512 > /proc/sys/vm/nr_hugepages
or
$ sysctl -w vm.nr_hugepages = 512
Based on our experience and feedback we have received from our users, here we include some of the problems a user may experience and the steps to resolve them. If you are experiencing any other problem, please feel free to contact us by sending an email to mvapich-discuss@cse.ohio-state.edu.
MVAPICH2 can be used over eight underlying interfaces, namely OFA-IB-CH3, OFA-IB-Nemesis, OFA-IWARP-CH3, OFA-RoCE-CH3, TrueScale (PSM-CH3), Omni-Path (PSM2-CH3), TCP/IP-CH3 and TCP/IP-Nemesis. Based on the underlying library being utilized, the troubleshooting steps may be different. We have divided the troubleshooting tips into four sections: General troubleshooting and Troubleshooting over any one of the five transport interfaces.
The MPI applications overriding the libc functions (e.g., malloc and free) to use custom memory allocators when running with MVAPICH2 library lead to issues in MVAPICH2’s memory interception mechanism. To circumvent this issue, the applications can try the following work around:
Using an application written using Python with MVAPICH2 can potentially result in the memory registration cache mechanism in MVAPICH2 being disabled at runtime due to an interaction between the Python memory allocator and the memory registration cache mechanism in MVAPICH2. We are working towards resolving this issue. In the mean time, we recommend that you try the following work arounds:
Using an application that utilizes the Google TCMalloc library with MVAPICH2 can potentially result in issues at compile time and/or runtime due to an interaction between the Google TCMalloc library and the memory registration cache mechanism in MVAPICH2. We are working towards resolving this issue. In the mean time, we recommend that you disable the memory registration cache mechanism in MVAPICH2 to work-around this issue. MVAPICH2 has the capability to memory disable registration cache support at configure / build time and also at runtime.
If the issue you are facing is at compile time, then you need to re-configure the MVAPICH2 library to disable memory registration cache at configure time using the “–disable-registration-cache” option. Please refer to Section 4.4 of the MVAPICH2 userguide for more details on how to disable registration cache at build time.
If the issue you are facing is at run time, then please re-run your application after setting
“MV2_USE_LAZY_MEM_UNREGISTER=0”. Please refer to Section 11.80 of the MVAPICH2 userguide
for more details on how to disable registration cache at run time.
Please refer to Section 9.1.4 for more details on the impact of disabling memory registration cache on application performance.
Whether disabling registration cache will have a negative effect on application performance depends entirely on the communication pattern of the application. If the application uses mostly small to medium sized messages (approximately less than 16 KB), then disabling registration cache will mostly have no impact on the performance of the application.
However, if the application uses messages of larger size, then there might be an impact depending on the frequency of communication. If this is the case, then it might be useful to increase the size of the internal communication buffer being used by MVAPICH2 (using the “MV2_VBUF_TOTAL_SIZE” environment variable) and the switch point between eager and rendezvous protocol in MVAPICH2 (using the “MV2_IBA_EAGER_THRESHOLD”) to a larger value. In this scenario, we recommend that you set both to the same value (possibly slightly greater than the median message size being used by your application). Please refer to Sections 11.24 and 11.104 of the userguide for more information about these two parameters.
OFED provides network vendor specific kernel module parameters to control the size of Memory translation table(MTT) used to map virtual to physical address. This will limit the amount of physical memory can be registered with InfiniBand device. The following two parameters are provided to control the size of this table.
The amount of memory that can be registered is calculated by
max_reg_mem = (2log_num_mtt) * (2log_mtts_per_seg) * PAGE_SIZE
It is recommended to adjust log_num_mtt to allow at least twice the amount of physical memory on your machine. For example, if a node has 64 GB of memory and a 4 KB page size, log_num_mtt should be set to 24 and (assuming log_mtts_per_seg is set to 1)
These parameters are set on the mlx4_core module in /etc/modprobe.conf
options mlx4_core log_num_mtt=24
This is a problem which typically occurs due to the presence of multiple installations of MVAPICH2 on the same set of nodes. The problem is due to the presence of mpi.h other than the one, which is used for executing the program. This problem can be resolved by making sure that the mpi.h from other installation is not included.
fork() and system() is supported for the OpenFabrics device as long as the kernel is being used is Linux 2.6.16 or newer. Additionally, the version of OFED used should be 1.2 or higher. The environment variable IBV_FORK_SAFE=1 must also be set to enable fork support.
MVAPICH2 uses CPU affinity to have better performance for single-threaded programs. For multi-threaded programs, e.g. MPI+OpenMP, it may schedule all the threads of a process to run on the same CPU. CPU affinity should be disabled in this case to solve the problem, i.e. set MV2_ENABLE_AFFINITY to 0. In addition, please read Section 6.18 on using MVAPICH2 in multi-threaded environments. We also recommend using the compiler/platform specific run-time options to bind the OpenMP threads to processors. Please refer to Section ( 6.19) for more information.
If you are using ADIO support for Lustre, please make sure of the following:
– Check your Lustre setup
– You are able to create, read to and write from files in the Lustre mounted directory
– The directory is mounted on all nodes on which the job is executed
– The path to the file is correctly specified
– The permissions for the file or directory are correctly specified
If you are using ADIO support for Lustre, the recent Lustre releases require an additional mount option to
have correct file locks. Please include the following option with your Lustre mount command: “-o
localflock”.
$ mount -o localflock -t lustre xxxx@o2ib:/datafs /mnt/datafs
MPI programs built with gfortran might not appear to run correctly due to the default output buffering
used by gfortran. If it seems there is an issue with program output, the GFORTRAN_UNBUFFERED_ALL
variable can be set to “y” and exported into the environment before using the mpiexec or mpirun_rsh
command to launch the program, as below:
$ export GFORTRAN_UNBUFFERED_ALL=y
Or, if using mpirun_rsh, export the environment variable as in the example:
$ mpirun_rsh -np 2 n1 n2 GFORTRAN_UNBUFFERED_ALL=y ./a.out
The mpiname application is provided with MVAPICH2 to assist with determining the MPI library version and related information. The usage of mpiname is as follows:
$ mpiname [OPTION]
Print MPI library information. With no OPTION, the output is the same as -v.
-a print all information
-c print compilers
-d print device
-h display this help and exit
-n print the MPI name
-o print configuration options
-r print release date
-v print library version
MVAPICH2 is configured to be built with shared-libraries by default. To link your application to the static version of the library, use the command below when compiling your application:
$ mpicc -noshlib -o cpi cpi.c
Yes, as long as you compile MVAPICH2 and your programs on one of the systems, either AMD or Intel, and run the same binary across the systems. MVAPICH2 has platform specific parameters for performance optimizations and it may not work if you compile MVAPICH2 and your programs on different systems and try to run the binaries together.
We recommend that you enable debugging when you intend to take a look at back traces of processes in GDB (or other debuggers). You can use the following configure options to enable debugging: --enable-g=dbg --disable-fast.
Additionally:
You can specify a different group id for your MPI application using the -sg group option to mpirun_rsh. The following example executes a.out on host1 and host2 using secondarygroup as their group id.
$ mpirun_rsh -sg secondarygroup -np 2 host1 host2 ./a.out
If mpirun_rsh fails with this error message, it was unable to locate a necessary utility. This can be fixed by ensuring that all MVAPICH2 executables are in the PATH on all nodes. If PATHs cannot be setup as mentioned, then invoke mpirun_rsh with a path prefix. For example:
$ /path/to/mpirun_rsh -np 2 node1 node2 ./mpi_proc
Ensure that the MVAPICH2 job launcher mpirun_rsh is compiled with debug symbols. Details are available in Section 5.2.12.
configure: error: Unable to convert MPI_SIZEOF_AINT to a hex string.
This is either because we are building on a very strange platform or there is a bug
somewhere in configure.
This error can be misleading. The problem is often not that you’re building on a strange platform, but that there was some problem running an executable that made configure have trouble determining the size of a datatype. The true problem is often that you’re trying to link against a library that is not found in your system’s default path for linking at runtime. Please check that you’ve properly set LD_LIBRARY_PATH or used the correct rpath settings in LDFLAGS.
There is a known bug with the PathScale compiler (before version 2.5) when building MVAPICH2. This problem will be solved in the next major release of the PathScale compiler. To work around this bug, use the the “-LNO:simd=0” C compiler option. This can be set in the build script similarly to:
Please note the use of double quotes. If you are building MVAPICH2 using the PathScale compiler (version below 2.5), then you should add “-g” to your CFLAGS, in order to get around a compiler bug.
There have been recent reports of this issue when using the PGI compiler. This may be able to be solved by adding “-ta=tesla:nordc” to your CFLAGS. The following example shows MVAPICH2 being configured with the proper CPPFLAGS and CFLAGS to get around this issue (Note: –enable-cuda=basic is optional).
If you are using a compiler that is not recognized by autoconf as a GNU compiler, Libtool uses an default library search path to look for shared objects which is ”/lib /usr/lib /usr/local/lib”. Then, if your libraries are not in one of these paths, MVAPICH2 may fail to link properly.
You can work around this issue by adding the following configure flags:
The above example considers that the correct library search path for your system is ”/lib64 /usr/lib64 /usr/local/lib64”.
The above error reports that the InfiniBand Adapter is not ready for communication. Make sure that the drivers are up. This can be done by executing the following command which gives the path at which drivers are setup.
$ locate libibverbs
In order to check the status of the IB link, one of the OFED utilities can be used: ibstatus, ibv_devinfo.
A possible reason could be inability to pin the memory required. Make sure the following steps are taken.
With some distros, we’ve found that adding the ulimit -l line to the sshd init script is no longer necessary. For instance, the following steps work for our RHEL5 systems.
If your system has multiple HCAs per node, ensure that the number of HCAs per node is the same across all nodes. Otherwise, specify the correct number of HCAs using the parameter 11.33.
If you configure MVAPICH2 with RDMA_CM and see this issue, ensure that the different HCAs on the same node are on different subnets.
HSAM functionality uses multi-pathing mechanism with LMC functionality. However, some versions of OpenFabrics Drivers (including OpenFabrics Enterprise Distribution (OFED) 1.1) and using the Up*/Down* routing engine do not configure the routes correctly using the LMC mechanism. We strongly suggest to upgrade to OFED 1.2, which supports Up*/Down* routing engine and LMC mechanism correctly.
MVAPICH2 (OFA-IB-CH3) provides network fault tolerance with Automatic Path Migration (APM). However, APM is supported only with OFED 1.2 onwards. With OFED 1.1 and prior versions of OpenFabrics drivers, APM functionality is not completely supported. Please refer to Section 11.72 and section 11.73
If you configure MVAPICH2 with RDMA_CM and see this error, you need to verify if you have setup up the local IP address to be used by RDMA_CM in the file /etc/mv2.conf. Further, you need to make sure that this file has the appropriate file read permissions. Please follow Section 6.16 for more details on this.
If you get this error, please verify that the IP address specified /etc/mv2.conf is correctly specified with the IP address of the device you plan to use RDMA_CM with.
If see this error, you need to check whether the specified network is working or not.
If you configure MVAPICH2 with RDMA_CM and see this error, you need to verify if you have setup up the local IP address to be used by RDMA_CM in the file /etc/mv2.conf. Further, you need to make sure that this file has the appropriate file read permissions. Please follow Section 5.2.8 for more details on this.
If you get this error, please verify that the IP address specified /etc/mv2.conf is correctly specified with the IP address of the device you plan to use RDMA_CM with.
If see this error, you need to check whether the specified network is working or not.
Please make sure the following things for a successful restart:
The following things can cause a restart to fail:
FAQ regarding Berkeley Lab Checkpoint/Restart (BLCR) can be found at:
http://upc-bugs.lbl.gov/blcr/doc/html/FAQ.html And the user guide for BLCR can be found at
http://upc-bugs.lbl.gov/blcr/doc/html/BLCR_Users_Guide.html
If you encounter any problem with the Checkpoint/Restart support, please feel free to contact us at mvapich-discuss@cse.ohio-state.edu.
There is a large, yet finite number of jobs that can run in parallel which takes advantage of SHArP. If this limit is exceeded, one may observe errors like ERROR sharp_get_job_data_len failed: Job not found. This is a system limitation.
If set, the system configuration file is not processed.
If set, the user configuration file is not processed.
Specify the path of a user configuration file for mvapich2. If this is not set the default path of “ /.mvapich2.conf” is used.
Set the limit for the core size resource. It allows to specify the maximum size for a core dump to be generated. It only set the soft limit and it has the respect the hard value set on the nodes.
It is similar to the ulimit -c <coresize> that can be run in the shell, but this will only apply to the MVAPICH2 processes (MPI processes, mpirun_rsh, mpispawn).
Examples:
Show a backtrace when a process fails on errors like ”Segmentation faults”, ”Bus error”, ”Illegal Instruction”, ”Abort” or ”Floating point exception”.
If your application uses the static version of the MVAPICH2 library, you have to link your application with the -rdynamic flag in order to see the function names in the backtrace. For more information, see the backtrace manpage.
Show the values assigned to the run time environment parameters
If set to 1, it shows the CPU mapping of all processes on node where rank 0 exists. If set to 2, it shows the CPU mapping of all processes on all nodes.
This parameter can be used to determine the threshold for the 2-level Allreduce algorithm. We now use the
shared-memory-based algorithm for messages smaller than the
MV2_SHMEM_ALLREDUCE_MSG threshold (11.57), the 2-level algorithm for medium sized messages
up to the threshold defined by this parameter. We use the default point-to-point algorithms messages
larger than this threshold.
This parameter determines the size of the buffer pool reserved for use in checkpoint aggregation. Note that this variable can be set with suffixes such as ‘K’/‘k’, ‘M’/‘m’ or ‘G’/‘g’ to denote Kilobyte, Megabyte or Gigabyte respectively.
The checkpoint data that has been coalesced into the buffer pool, is written to the back-end file system, with the value of this parameter as the chunk size. Note that this variable can be set with suffixes such as ‘K’/‘k’, ‘M’/‘m’ or ‘G’/‘g’ to denote Kilobyte, Megabyte or Gigabyte respectively.
This parameter specifies the path and the base file name for checkpoint files of MPI processes. The checkpoint files will be named as $MV2_CKPT_FILE.<number of checkpoint>.<process rank>, for example, /tmp/ckpt.1.0 is the checkpoint file for process 0’s first checkpoint. To checkpoint on network-based file systems, user just need to specify the path to it, such as /mnt/pvfs2/my_ckpt_file.
This parameter can be used to enable automatic checkpointing. To let MPI job console automatically take checkpoints, this value needs to be set to the desired checkpointing interval. A zero will disable automatic checkpointing. Using automatic checkpointing, the checkpoint file for the MPI job console will be named as $MV2_CKPT_FILE.<number of checkpoint>.auto. Users need to use this file for restart.
This parameter is used to limit the number of checkpoints saved on file system to save the file system space. When set to a positive value N, only the last N checkpoints will be saved.
When this parameter is set to any value, the checkpoints will not be required to sync to disk. It can reduce the checkpointing delay in many cases. But if users are using local file system, or any parallel file system with local cache, to store the checkpoints, it is recommended not to set this parameter because otherwise the checkpoint files will be cached in local memory and will likely be lost upon failure.
This parameter enables/disables Checkpoint aggregation scheme at run time. It is set to ’1’(enabled) by default, when the user enables Checkpoint/Restart functionality at configure time, or when the user explicitly configures MVAPICH2 with aggregation support. Please note that, to use aggregation support, each node needs to be properly configured with FUSE library (cf section 6.15.1).
This parameter enables/disables the debug output for Fault Tolerance features (Checkpoint/Restart and Migration).
Note: All debug output is disabled when MVAPICH2 is configured with the --enable-fast=ndebug option.
This defines the number of buffers used by connection manager to establish new connections. These buffers are quite small and are shared for all connections, so this value may be increased to 8192 for large clusters to avoid retries in case of packet drops.
This is the number of the connection manager polls for new control messages from UD channel for each interrupt. This may be increased to reduce the interrupt overhead when many incoming control messages from UD channel at the same time.
This is the timeout value associated with connection management messages via UD channel. Decreasing this value may lead to faster retries but at the cost of generating duplicate messages.
This allows users to specify process to CPU (core) mapping. The detailed usage of this parameter is described in Section 6.5.3. This parameter will not take effect if either MV2_ENABLE_AFFINITY or MV2_USE_SHARED_MEM run-time parameters are set to 0, or if the library was configured with the “–disable-hwloc” option. MV2_CPU_MAPPING is currently not supported on Solaris.
We have changed the default value of MV2_CPU_BINDING_POLICY to “hybrid” along with
MV2_HYBRID_BINDING_POLICY=bunch. It is same as setting MV2_CPU_BINDING_POLICY to
bunch. However, it also works well for the systems with hyper-threading enabled or systems that have
vendor specific core mappings. This allows users to specify process to CPU (core) mapping with the CPU
binding policy. The detailed usage of this parameter is described in Section 6.5.1. This parameter will not
take effect: if
MV2_ENABLE_AFFINITY or MV2_USE_SHARED_MEM run-time parameters are set to 0; or
MV2_ENABLE_AFFINITY is set to 1 and MV2_CPU_MAPPING is set, or if the library was configured
with the “–disable-hwloc” option. The value of MV2_CPU_BINDING_POLICY can be “bunch”,
“scatter”, or “hybrid”. When this parameter takes effect and its value isn’t set, “bunch” will be used as
the default policy.
This allows users to specify binding policies for application thread in MPI+Threads applications. The
detailed usage of this parameter is described in Section 6.21. This parameter will not take effect: if
MV2_ENABLE_AFFINITY or MV2_USE_SHARED_MEM run-time parameters are set to 0; or
MV2_CPU_BINDING_POLICY is set to “bunch” or “scatter”, or
MV2_ENABLE_AFFINITY is set to 1 and MV2_CPU_MAPPING is set, or if the library was configured
with the “–disable-hwloc” option. The value of MV2_HYBRID_BINDING_POLICY can be “linear”,
“compact”, “bunch”, “scatter”, “spread”, or “numa”. When this parameter takes effect and its value isn’t
set, “linear” will be used as the default policy.
This allows users to specify process to CPU (core) mapping at different binding level. The detailed usage of this parameter is described in Section 6.5.1. This parameter will not take effect: if MV2_ENABLE_AFFINITY or MV2_USE_SHARED_MEM run-time parameters are set to 0; or MV2_ENABLE_AFFINITY is set to 1 and MV2_CPU_MAPPING is set, or if the library was configured with the “–disable-hwloc” option. The value of MV2_CPU_BINDING_LEVEL can be “core”, “socket”, or “numanode”. When this parameter takes effect and its value isn’t set, “core” will be used as the default binding level.
If set to 1, it shows the HCA binding of all processes on node where rank 0 exists. If set to 2, it shows the HCA binding of all processes on all nodes.
This specifies the maximum number of send WQEs on each QP. Please note that for OFA-IB-CH3 and OFA-iWARP-CH3, the default value of this parameter will be 16 if the number of processes is larger than 256 for better memory scalability.
This specifies the maximum number of receive WQEs on each QP (maximum number of receives that can be posted on a single QP).
The internal MTU size. For OFA-IB-CH3, this parameter should be a string instead of an integer. Valid values are: IBV_MTU_256, IBV_MTU_512, IBV_MTU_1024, IBV_MTU_2048, IBV_MTU_4096.
Select the partition to be used for the job.
Enable CPU affinity by setting MV2_ENABLE_AFFINITY to 1 or disable it by setting
MV2_ENABLE_AFFINITY to 0. MV2_ENABLE_AFFINITY is currently not supported on Solaris. CPU
affinity is also not supported if MV2_USE_SHARED_MEM is set to 0.
This defines the threshold beyond which the MPI_Get implementation is based on direct one sided RDMA operations.
This specifies the switch point between eager and rendezvous protocol in MVAPICH2. For better performance, the value of MV2_IBA_EAGER_THRESHOLD should be set the same as MV2_VBUF_TOTAL_SIZE.
This specifies the HCA’s to be used for performing network operations.
This defines the initial number of pre-posted receive buffers for each connection. If communication happen
for a particular connection, the number of buffers will be increased to
RDMA_PREPOST_DEPTH.
This defines the process size beyond which we use multiple completion queues for iWARP interface.
This defines the degree of the knomial operation during the intra-node knomial broadcast phase.
This defines the degree of the knomial operation during the inter-node knomial broadcast phase.
This defines the maximum inline size for data transfer. Please note that the default value of this parameter will be 0 when the number of processes is larger than 256 to improve memory usage scalability.
Maximum number of RMA windows that can be created and active concurrently. Typically this value is sufficient for most applications. Increase this value to the number of windows your application uses
This defines the total number of buffers that can be stored in the registration cache. It has no effect if MV2_USE_LAZY_MEM_UNREGISTER is not set. A larger value will lead to less frequent lazy de-registration.
This parameter indicates number of InfiniBand adapters to be used for communication on an end node.
This parameter indicates number of ports per InfiniBand adapter to be used for communication per adapter on an end node.
This parameter is to select the specific HCA port on a active multi port InfiniBand adapter
Number of times the MPI library will attempt to query the subnet to obtain the path record information before giving up.
This parameter indicates number of queue pairs per port to be used for communication on an end node. This is useful in the presence of multiple send/recv engines available per port for data transfer.
This specifies the policy that will be used to assign HCAs to each of the processes. In the previous versions of MVAPICH2 it was known as MV2_SM_SCHEDULING.
This specifies the threshold for the message size beyond which striping will take place. In the previous versions of MVAPICH2 it was known as MV2_STRIPING_THRESHOLD
When MV2_RAIL_SHARING_POLICY is set to the value “FIXED_MAPPING” this variable decides the manner in which the HCAs will be mapped to the rails. The <CUSTOM LIST> is colon(:) separated list with the HCA ranks specified. e.g. 0:1:1:0. This list must map equally to the number of local processes on the nodes failing which, the default policy will be used. Similarly the number of processes on each node must be the same. The detailed usage of this parameter is described in Section 6.13.
The size of the buffer used in RDMA fast path communication. This value will be ineffective if
MV2_USE_RDMA_FAST_PATH is not set
The number of RDMA buffers used for the RDMA fast path. This fast path is used to reduce latency and overhead of small data and control messages. This value will be ineffective if MV2_USE_RDMA_FAST_PATH is not set.
This defines threshold for enabling on-demand connection management scheme. When the size of the job is larger than the threshold value, on-demand connection management will be used.
Set this parameter to 1 on homogeneous clusters to optimize the job start-up
This defines the number of buffers pre-posted for each connection to handle send/receive operations.
This parameter enables the dumping of run-time debug counters from the MVAPICH2-PSM progress engine. Counters are dumped every PSM_DUMP_FREQUENCY seconds.
This parameters sets the frequency for dumping MVAPICH2-PSM debug counters. Value takes effect only in PSM_DEBUG is enabled.
This defines the threshold beyond which the MPI_Put implementation is based on direct one sided RDMA operations.
This parameter specifies the message size above which we begin the stripe the message across multiple rails (if present).
This parameter specifies the ARP timeout to be used by RDMA CM module.
This parameter specifies the upper limit of the port range to be used by the RDMA CM module when choosing the port on which it listens for connections.
This parameter specifies the lower limit of the port range to be used by the RDMA CM module when choosing the port on which it listens for connections.
This parameter can be used to determine the threshold for the 2-level reduce algorithm. We now use the shared-memory-based algorithm for messages smaller than the MV2_SHMEM_REDUCE_MSG (11.63), the 2-level algorithm for medium sized messages up to the threshold defined by this parameter. We use the default point-to-point algorithms messages larger than this threshold.
The value of this variable can be set to choose different Rendezvous protocols. RPUT (default RDMA-Write) RGET (RDMA Read based), R3 (send/recv based).
The value of this variable controls what message sizes go over the R3 rendezvous protocol. Messages above this message size use MV2_RNDV_PROTOCOL.
The value of this variable controls what message sizes go over the R3 rendezvous protocol when the registration cache is disabled (MV2_USE_LAZY_MEM_UNREGISTER=0). Messages above this message size use MV2_RNDV_PROTOCOL.
The SHMEM AllReduce is used for messages less than this threshold.
The number of leader processes that will take part in the SHMEM broadcast operation. Must be greater than the number of nodes in the job.
The SHMEM bcast is used for messages less than this threshold.
This parameter can be used to select the max buffer size of message for shared memory collectives.
This parameter can be used to select the number of communicators using shared memory collectives.
This parameter can be used to specify the path to the shared memory files for intra-node communication.
The SHMEM reduce is used for messages less than this threshold.
This parameter enables/disables LiMIC2 at run time. It does not take effect if MVAPICH2 is not configured with –with-limic2.
This parameter enables/disables CMA based intra-node communication at run time. It does not take effect if MVAPICH2 is configured with –without-cma. When –with-limic2 is included in the configure flags, LiMIC2 is used in preference over CMA. Please set MV2_SMP_USE_LIMIC2 to 0 in order to choose CMA if MVAPICH2 is configured with –with-limic2.
This is the low water-mark limit for the Shared Receive Queue. If the number of available work entries on the SRQ drops below this limit, the flow control will be activated.
This is the maximum number of work requests allowed on the Shared Receive Queue. Upon receiving a SRQ limit event, the current value of MV2_SRQ_SIZE will be doubled or moved to the maximum of MV2_SRQ_MAX_SIZE, whichever is smaller
This is the initial number of work requests posted to the Shared Receive Queue.
This parameter specifies the message size above which we begin the stripe the message across multiple rails (if present).
This option enables the dynamic process management interface and on-demand connection management.
This parameter is used for recovery from network faults using Automatic Path Migration. This functionality is beneficial in the presence of multiple paths in the network, which can be enabled by using lmc mechanism.
This parameter is used for testing the Automatic Path Migration functionality. It periodically moves the alternate path as the primary path of communication and re-loads another alternate path.
Setting this parameter enables MVAPICH2 to use blocking mode progress. MPI applications do not take up any CPU when they are waiting for incoming messages.
Setting this parameter enables message coalescing to increase small message throughput
Use the “Direct” algorithm for the MPI_Gather operation. If this parameter is set to 0 at run-time, the “Direct” algorithm will not be invoked.
Use the “Direct” algorithm for the MPI_Scatter operation. If this parameter is set to 0 at run-time, the “Direct” algorithm will not be invoked.
This parameter is used for utilizing hot-spot avoidance with InfiniBand clusters. To leverage this functionality, the subnet should be configured with lmc greater than zero. Please refer to section 6.22 for detailed information.
This parameter enables the library to run in iWARP mode.
Setting this parameter enables MVAPICH2 to use memory registration cache.
This parameter enables the use of RDMA over Ethernet for MPI communication. The underlying HCA and network must support this feature.
In RoCE mode, this parameter allows to choose non-default GID index in loss-less ethernet setup using VLANs
This parameter enables the use of RDMA CM for establishing the connections.
This parameter allows MPI jobs to be run across multiple subnets interconnected by InfiniBand routers. Note that this requires RDMA_CM support to be enabled at configure time and runtime. Note that, RDMA_CM support is enabled by default at configure time. At runtime, the MV2_USE_RDMA_CM environment variable described in Section 11.83 must be set to 1.
This parameter is to specify the path to mv2.conf file. If this is not given, then it searches in the default location /etc/mv2.conf
Setting this parameter enables MVAPICH2 to use adaptive RDMA fast path features for OFA-IB-CH3 interface.
Setting this parameter allows MVAPICH2 to use optimized one sided implementation based RDMA operations.
Setting this parameter enables MVAPICH2 to use ring based start up.
Use shared memory for intra-node communication.
This parameter can be used to turn off shared memory based MPI_Allreduce for OFA-IB-CH3 over IBA by setting this to 0.
This parameter can be used to turn off shared memory based MPI_Barrier for OFA-IB-CH3 over IBA by setting this to 0.
This parameter can be used to turn off shared memory based MPI_Bcast for OFA-IB-CH3 over IBA by setting this to 0.
Use shared memory for collective communication. Set this to 0 for disabling shared memory collectives.
This parameter can be used to turn off shared memory based MPI_Reduce for OFA-IB-CH3 over IBA by setting this to 0.
Setting this parameter enables MVAPICH2 to use shared receive queue.
We use different algorithms depending on the system size. For small system sizes (up to 386 cores), we use the “2-level” algorithm following by the “Direct” algorithm. For medium system sizes (up to 1k), we use “Binomial” algorithm following by the “Direct” algorithm. Users can set the switching point between algorithms using the run-time parameter MV2_GATHER_SWITCH_PT.
When the system size is lower than 512 cores, we use the “Binomial” algorithm for small message sizes. MV2_SCATTER_SMALL_MSG allows the users to set the threshold for small messages.
When the system size is lower than 512 cores, we use the “2-level” algorithm for medium message sizes. MV2_SCATTER_MEDIUM_MSG allows the users to set the threshold for medium messages.
Use the two-level multi-core-aware algorithm for the MPI_Gather operation. If this parameter is set to 0 at run-time, the two-level algorithm will not be invoked.
Use the two-level multi-core-aware algorithm for the MPI_Scatter operation. If this parameter is set to 0 at run-time, the two-level algorithm will not be invoked.
Use the XRC InfiniBand transport available since Mellanox ConnectX adapters. This features requires OFED version later than 1.3. It also automatically enables SRQ and ON-DEMAND connection management. Note that the MVAPICH2 library needs to have been configured with –enable-xrc=yes to use this feature.
The number of vbufs in the initial pool. This pool is shared among all the connections.
The number of vbufs allocated each time when the global pool is running out in the initial pool. This is also shared among all the connections.
The size of each vbuf, the basic communication buffer of MVAPICH2. For better performance, the value of MV2_IBA_EAGER_THRESHOLD should be set the same as MV2_VBUF_TOTAL_SIZE.
This parameter defines the switch point from Eager protocol to Rendezvous protocol for intra-node communication. Note that this variable can be set with suffixes such as ‘K’/‘k’, ‘M’/‘m’ or ‘G’/‘g’ to denote Kilobyte, Megabyte or Gigabyte respectively.
This parameter defines the size of shared buffer between every two processes on the same node for transferring messages smaller than or equal to MV2_SMP_EAGERSIZE. Note that this variable can be set with suffixes such as ‘K’/‘k’, ‘M’/‘m’ or ‘G’/‘g’ to denote Kilobyte, Megabyte or Gigabyte respectively.
This parameter defines the number of internal send buffers for sending intra-node messages larger than MV2_SMP_EAGERSIZE.
This parameter defines the packet size when sending intra-node messages larger than
MV2_SMP_EAGERSIZE.
Set this to 0, to not use any HugePages.
This defines the threshold for enabling Hybrid communication using UD and RC/XRC. When the size of the job is greater than or equal to the threshold value, Hybrid mode will be enabled. Otherwise, it uses default RC/XRC connections for communication.
Maximum number of RC or XRC connections created per process. This limits the amount of connection memory and prevents HCA QP cache thrashing.
Time (usec) until ACK status is checked (and ACKs are sent if needed). To avoid unnecessary retries, set
this value less than MV2_UD_RETRY_TIMEOUT. It is recommended to set this to 1/10 of
MV2_UD_RETRY_TIMEOUT.
Time (usec) after which an unacknowledged message will be retried
Number of retries of a message before the job is aborted. This is needed in case of HCA fails.
Set this to Zero, to disable UD transport in hybrid configuration mode.
Set this to 1, to enable only UD transport in hybrid configuration mode. It will not use any RC/XRC connections in this mode.
Whether or not to use the zero-copy transfer mechanism to transfer large messages on UD transport.
If this flag is set to 1, we will use intra-node Zero-Copy MPI_Gather designs, when the library has been configured to use LiMIC2.
Set this to 1, to enable hardware multicast support in collective communication
This defines the threshold for enabling multicast support in collective communication. When MV2_USE_MCAST is set to 1 and the number of nodes in the job is greater than or equal to the threshold value, it uses multicast support in collective communication
set this to One. to enable support for communication with GPU device buffers.
The chunk size used in large message transfer from device memory to host memory. The other suggested values for this parameter are 131072 and 524288.
This controls the number of CUDA threads per block in pack/unpack kernels for MPI vector datatype in communication involving GPU device buffers.
This controls the y-dimension of a thread block in pack/unpack kernels for MPI vector datatype in communication involving GPU device buffers. It controls the number of threads operating on each block of data in a vector.
This controls the use of non-blocking streams for asynchronous CUDA memory copies in communication involving GPU memory.
This enables intra-node GPU-GPU communication using IPC feature available from CUDA 4.1
This enables an optimization for short message GPU device-to-device communication using IPC feature available from CUDA 4.1
Set this to 1, to enable hardware SHArP support in collective communication
By default, this is set by the MVAPICH2 library. However, you can explicitly set the HCA name which is realized by the SHArP library.
By default, this is set by the MVAPICH2 library. However, you can explicitly set the HCA port which is realized by the SHArP library.
This parameter enables/disables support for socket-aware collective communication. The parameter MV2_USE_SHMEM_COLL must be set to 1 for this to work.
This parameter determines whether a topology-aware algorithm should be used or not for allreduce collective operations. It takes effect only if MV2_ENABLE_TOPO_AWARE_COLLECTIVES is set to 1.
This parameter determines whether a topology-aware algorithm should be used or not for barrier collective operations. It takes effect only if MV2_ENABLE_TOPO_AWARE_COLLECTIVES is set to 1.
This parameter enables support for RDMA_CM based multicast group setup. Requires the parameter MV2_USE_MCAST to be set to 1.
This specifies the maximum number of send WQEs on each QP. Please note that for Gen2 and Gen2-iWARP, the default value of this parameter will be 16 if the number of processes is larger than 256 for better memory scalability.
This specifies the maximum number of receive WQEs on each QP (maximum number of receives that can be posted on a single QP).
The internal MTU size. For Gen2, this parameter should be a string instead of an integer. Valid values are: IBV_MTU_256, IBV_MTU_512, IBV_MTU_1024, IBV_MTU_2048, IBV_MTU_4096.
Select the partition to be used for the job.
This specifies the switch point between eager and rendezvous protocol in MVAPICH2. For better performance, the value of MV2_IBA_EAGER_THRESHOLD should be set the same as MV2_VBUF_TOTAL_SIZE.
This specifies the HCA to be used for performing network operations.
This defines the initial number of pre-posted receive buffers for each connection. If communication happen
for a particular connection, the number of buffers will be increased to
RDMA_PREPOST_DEPTH.
This defines the maximum inline size for data transfer. Please note that the default value of this parameter will be 0 when the number of processes is larger than 256 to improve memory usage scalability.
This defines the total number of buffers that can be stored in the registration cache. It has no effect if MV2_USE_LAZY_MEM_UNREGISTER is not set. A larger value will lead to less frequent lazy de-registration.
The number of RDMA buffers used for the RDMA fast path. This fast path is used to reduce latency and overhead of small data and control messages. This value will be ineffective if MV2_USE_RDMA_FAST_PATH is not set.
Number of times the MPI library will attempt to query the subnet to obtain the path record information before giving up.
This defines the number of buffers pre-posted for each connection to handle send/receive operations.
The value of this variable can be set to choose different Rendezvous protocols. RPUT (default RDMA-Write) RGET (RDMA Read based), R3 (send/recv based).
The value of this variable controls what message sizes go over the R3 rendezvous protocol. Messages above this message size use MV2_RNDV_PROTOCOL.
The value of this variable controls what message sizes go over the R3 rendezvous protocol when the registration cache is disabled (MV2_USE_LAZY_MEM_UNREGISTER=0). Messages above this message size use MV2_RNDV_PROTOCOL.
This is the low water-mark limit for the Shared Receive Queue. If the number of available work entries on the SRQ drops below this limit, the flow control will be activated.
This is the maximum number of work requests allowed on the Shared Receive Queue.
This parameter specifies the message size above which we begin the stripe the message across multiple rails (if present).
Setting this parameter enables mvapich2 to use blocking mode progress. MPI applications do not take up any CPU when they are waiting for incoming messages.
Setting this parameter enables mvapich2 to use memory registration cache.
Setting this parameter enables MVAPICH2 to use adaptive rdma fast path features for the Gen2 interface.
Setting this parameter enables mvapich2 to use shared receive queue.
The number of vbufs in the initial pool. This pool is shared among all the connections.
The number of vbufs allocated each time when the global pool is running out in the initial pool. This is also shared among all the connections.
The size of each vbuf, the basic communication buffer of MVAPICH2. For better performance, the value of MV2_IBA_EAGER_THRESHOLD should be set the same as MV2_VBUF_TOTAL_SIZE.
This enables run through stabilization support to handle the process failures. This is valid only with Hydra process manager with –disable-auto-cleanup flag.
The local rank of a process on a node within its job. The local rank ranges from 0,1 ... N-1 on a node with N processes running on it.
The number of ranks from this job that are running on this node.
The MPI rank of this process in current MPI job
The number of processes in this MPI job’s MPI_Comm_World.
Number of nodes beyond which to use hierarchical ssh during start up. This parameter is only relevant for mpirun_rsh based start up. Note that unlike most other parameters described in this section, this is an environment variable that has to be set in the run time environment (for e.g. through export in the bash shell).
Number of processes beyond which to use file-based communication scheme in the hierarchical ssh during start up. This parameter is only relevant for mpirun_rsh based start up.
The number of seconds after which mpirun_rsh aborts job launch. Note that unlike most other parameters described in this section, this is an environment variable that has to be set in the run time environment (for e.g. through export in the bash shell).
The degree of the hierarchical tree used by mpirun_rsh. Note that unlike most other parameters described in this section, this is an environment variable that has to be set in the run time environment (for e.g. through export in the bash shell).
Set this to limit, in seconds, of the execution time of the mpi application. This overwrites the
MV2_MPIRUN_TIMEOUT parameter.
Set the verbosity level of the debug output for the process management operations (fork, waitpid, kill, ...) of mpirun_rsh and mpispawn processes. The value 0 disables any debug output, a value of 1 enables a basic debug output, and a value of 2 enables a more verbose debug output.
Note: All debug output is disabled when MVAPICH2 is configured with the --enable-fast=ndebug option.